TGMC:Guide to Base Building: Difference between revisions
imported>Ttly mNo edit summary |
imported>Ttly |
||
| (3 intermediate revisions by the same user not shown) | |||
| Line 36: | Line 36: | ||
====1. Good cade placement:==== | ====1. Good cade placement:==== | ||
-Cades immediately next to each other: This allows the front layer to be repaired while still being under the cover of the second cade layer, this stops you from being attacked by projectiles mid-repairs. Although there are some downsides to this line of thought, the benefit is still worth considering. | -Cades immediately next to each other: This allows the front layer to be repaired while still being under the cover of the second cade layer, this stops you from being attacked by projectiles mid-repairs. Although there are some downsides to this line of thought, the benefit is still worth considering. | ||
Downsides include: More cades being covered by a single boiler gas glob (which doesn't do noteworthy damage on its own), more cades being damaged by an explosion (which is generally only caused by marine weaponry). | |||
Benefits include: Being able to weld the frontmost layer from the second layer, being able to immediately replace a destroyed front layer cade by unanchoring a cade and moving it to the front, minimal amount of material needed compared to other layouts. | |||
-Inward expansion: By expanding the defensive line inwards, in the event that the outer line of barricades were destroyed, the second layer would act as a chokepoint that allows for better line of fire. | -Inward expansion: By expanding the defensive line inwards, in the event that the outer line of barricades were destroyed, the second layer would act as a chokepoint that allows for better line of fire. | ||
| Line 121: | Line 125: | ||
-Can be electrified by placing cables connected to a powered APC terminal underneath. | -Can be electrified by placing cables connected to a powered APC terminal underneath. | ||
-Has 1/3rd the durability of unupgraded metal barricade against acid damage. | -Has 1/3rd the durability of unupgraded metal barricade against acid and bullet/laser/energy damage. | ||
|- | |- | ||
|[[file:TGMC_TL182Deployed.png|64px]] | |[[file:TGMC_TL182Deployed.png|64px]] | ||
| Line 212: | Line 216: | ||
==Deconstruction== | ==Deconstruction== | ||
Unless the barricade is at full health, you won't get all your materials back. Make sure it's repaired | Unless the barricade is at full health, you won't get all your materials back. Make sure it's repaired with a welder first if possible. | ||
Dismantling an barricade that has been vomited with acid will return some of the materials instead of it disappearing completely, though you have to remove the barbed wire with wirecutters for vomited barricades, as they do not appear if the barricade is dismantled. | |||
'''You can''' '''dismantle''' '''multiple cades simultaneously.''' | '''You can''' '''dismantle''' '''multiple cades simultaneously.''' | ||
Latest revision as of 11:41, 3 February 2024

|
This page is a part of the TGMC wiki.
TGMC is a project based on the CM-SS13 codebase. |
The FOB stands for Forward-Operating-Base, its main purpose is to deter xenos from tampering with the dropship shuttle console and locking it, followed by hijacking/capturing it to end the round with xeno victory.
In order to achieve this goal, the FOB needs to be built in a defensible manner as to be an effective force multiplier for the defenders to be able to effectively defend it with as little manpower as possible as the more marines on the FOB there is, the less there could have been around the map helping with nuclear disks or attacking the hive.
This is a basic guide to tips and tricks of building a FOB during combat operations. This could mean the difference between Fort Knox that can last against a xeno attack for hours and a couch fort that crumbles at first contact.
Construction
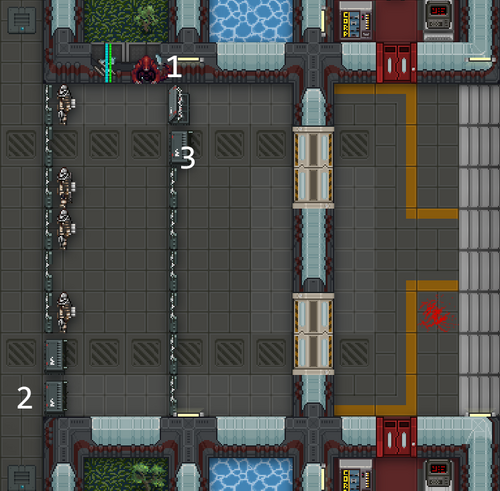
Example of a bad FOB layout:
Here are some of the things that are wrong with this layout:
1. There is a way to go around the barricades.
A line of barricade is only as strong as its weakest point, in this case the xenos can just go around and take the (slightly) longer way to circumvent the barricades.
2. Bad line of fire.
On point 2, a xeno can slash the barricade from the tile next to the vent and take cover behind the wall to avoid being shot.
3. Plasteel barricades not lined up.
These can cause issue by congesting foot traffic between marines defending the FOB which can be fatal in certain circumstances. But otherwise it's not as much of an offending issue.
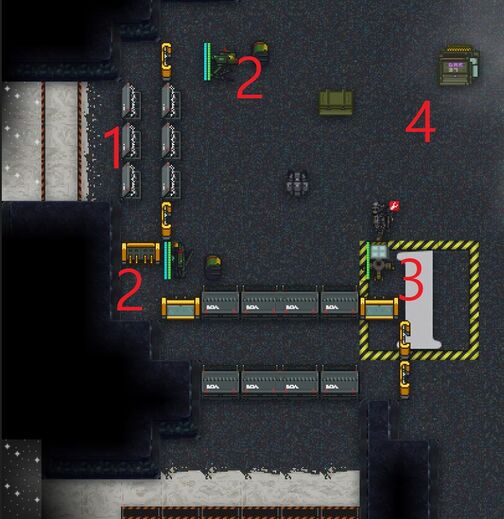
Example of a better FOB layout:
1. Good cade placement:
-Cades immediately next to each other: This allows the front layer to be repaired while still being under the cover of the second cade layer, this stops you from being attacked by projectiles mid-repairs. Although there are some downsides to this line of thought, the benefit is still worth considering.
Downsides include: More cades being covered by a single boiler gas glob (which doesn't do noteworthy damage on its own), more cades being damaged by an explosion (which is generally only caused by marine weaponry).
Benefits include: Being able to weld the frontmost layer from the second layer, being able to immediately replace a destroyed front layer cade by unanchoring a cade and moving it to the front, minimal amount of material needed compared to other layouts.
-Inward expansion: By expanding the defensive line inwards, in the event that the outer line of barricades were destroyed, the second layer would act as a chokepoint that allows for better line of fire.
-Strategic placement of plasteel barricade: The plasteel barricade is the strongest barricade structure available to marines, placing them in areas more likely to be attacked allows defenders to take advantage of its durability instead of placing it aside only to use it as a gate. In circumstances where you simply do not have enough plasteel, you can use either sandbags or metal barricades upgraded to the relevant type.
-Strategic placement and upgrade of metal barricade: The metal barricades has been upgraded to caustic in this case, as to make them more resistant to acid damage sources which comes from ranged xenomorphs as they've been placed in areas less vulnerable against slashes. The unupgraded metal barricade is otherwise the weakest type of fortification, as it has a low integrity. As such, it is recommended to upgrade them to either ballistic or caustic depending on whether they're in a spot that is vulnerable to slashes or to ranged spits.
2. Good sentry placement:
-Always set them to radial mode: This ensures that the sentry cannot be destroyed by a Wraith simply teleporting behind them. The shorter range you just have to swallow, as the alternative of letting it happen is worse. You can switch it back to normal mode if there's enough marines on the FOB defending it however.
-Away from Crusher lanes: Pay attention to the placement of the sentries, areas open for a Crusher to charge through (at least 7 tiles in a straight line) can spell its immediate destruction, though this can be avoided by simply placing them away from such areas as seen on the image.
-Close enough to cover cades from melee/vomits: What good is a sentry if it doesn't actually cover anything? Though you can't really cover the cades against acid spits as the ranged castes generally are able to outrange/attack the cades from an angle the sentry can't cover which is why it's essential to have actual marines defending the FOB still, even with sentries.
3. Light:
You can't shoot what you can't see, can you? Make sure to bring at least 3 floodlights or enough flares/flashlights to lighten up the FOB.
4: Supplies:
You should make a mental checklist on what supplies to bring to the FOB, generally these should include: ammo, medical supplies, engineering supplies, food, spare weapon/gear. Although this part can be mostly ignored if the FOB has a supply beacon to allow requisitions to send supplies to it, though it's more prudent to bring what you care about with you in the first place.
Defensive Structures
Barricade Upgrades
These can be applied on metal cades by clicking on them with metal sheets.
Except for the barbed wire which need to be made with metal sheets and can be used on any cades except for razorwire and wood.
Repairing Cades
Metal and plasteel can be repaired with a welder for 40 integrity per weld, unless they are under 20% integrity in which case they'll need 2 sheets of metal/plasteel to be brought back to a weldable integrity.
Sandbags can be repaired with filled sandbags for 20% integrity per bag.
Razorwire can be repaired with metal sheets for 20% integrity per sheet.
Walls can be repaired with a welder for 85 integrity per weld.
Deconstruction
Unless the barricade is at full health, you won't get all your materials back. Make sure it's repaired with a welder first if possible.
Dismantling an barricade that has been vomited with acid will return some of the materials instead of it disappearing completely, though you have to remove the barbed wire with wirecutters for vomited barricades, as they do not appear if the barricade is dismantled.
You can dismantle multiple cades simultaneously.
Metal & Plasteel Barricades:
 Screwdriver and wrench
  the barricade, to put the barricade in movable state, use a wrench to lock it back in place. However, the cade's own facing will block its own movement, you can get around this by moving it in a zig-zag pattern.
 Use a crowbar to dismantle the barricade while it is in movable state.
Sandbags
Use a shovel or unfolded entrenching tool and click on the sandbag barricade, do NOT be on harm intent as you will attack the barricade and damage it instead, resulting in less sandbags recovered.
Razorwire
 Use a wirecutter on it Note: deconstructing razorwire only yields 4 metal rods and one barbed wire back assuming it is at full integrity
Emplacements
These can be deployed by ctrl+clicking a tile next to you with them as an item in active hand.
To undeploy, click-drag the sprite of the emplacements into yourself while standing next to them.
To repair, use an active blowtorch to weld.


