TGMC:Guide to vehicles: Difference between revisions
imported>Qwerty4429 Moved Alamo to PO |
imported>Fallouttec →Motorbike: Big bike go vroom |
||
| (7 intermediate revisions by 4 users not shown) | |||
| Line 9: | Line 9: | ||
=The Planes= | =The Planes= | ||
=== Read [[TGMC: | === Read [[TGMC:Pilot_Officer#Alamo|Pilot Officer]] for info on planes === | ||
== Installing modules == | == Installing modules == | ||
| Line 49: | Line 29: | ||
==Drop Pods' UI== | ==Drop Pods' UI== | ||
Communicate with your team in order to get viable drop pod coordinates. Set them by either manually inputting the X and Y coordinates in the relevant fields, or by dragging the field up and down to increase or decrease the number. | <s>Communicate with your team in order to get viable drop pod coordinates. Set them by either manually inputting the X and Y coordinates in the relevant fields, or by dragging the field up and down to increase or decrease the number. | ||
To make sure your selected area is viable to drop to, press the "Check drop point validity" button. It will warn you if the area is roofed, inside terrain, or otherwise inaccessible. | To make sure your selected area is viable to drop to, press the "Check drop point validity" button. It will warn you if the area is roofed, inside terrain, or otherwise inaccessible. | ||
When ready, press the "Launch Droppod" button. Otherwise, you can exit with the "Exit Pod" button. | When ready, press the "Launch Droppod" button. Otherwise, you can exit with the "Exit Pod" button.<br> | ||
[[File:TGMC_drop_pods_ui.png]] | [[File:TGMC_drop_pods_ui.png]] | ||
<br> | <br> | ||
<small>Don't tell anyone, but you can use the Webmap for accurate drop coords.</small> | <small>Don't tell anyone, but you can use the Webmap for accurate drop coords.</small></s> | ||
<br> | |||
<br> | |||
<font size="3">Drop Pods now have the ability to select a drop pod location by Minimap, just hit the icon in top left while you are sat in the pod to pull up the ground Minimap and see where all your friends are/dying at. | |||
<br><br> | |||
See [[TGMC:Minimap|Minimap]] to learn what each icon represents in the Minimap menu | |||
<br><br> | |||
Once you are satified with your location, click and it should say that location is locked. If it does not work that means the location is underground or in an area that cannot be landed in, try again. | |||
<br> | |||
After that, Hit the drop button and get ready to dive, <s>Helldiver</s></font> | |||
=Motorbike= | =Motorbike= | ||
[[File:TGMC_vehicle_motorbike.png| | [[File:TGMC_vehicle_motorbike.png|128px]] <br>The premier in marine transportation technology - besides the Alamo, Tadpole, and every other transport vehicle. | ||
Allows full running-speed movement for one marine, upgradable to two with a sidecar, in exchange for fuel. Contains an internal storage bay for your convenience. | Allows full running-speed movement for one marine, upgradable to two with a sidecar, in exchange for fuel. Contains an internal storage bay for your convenience. | ||
Refueled using a jerry can, most immediately accessible through stealing them from the Condor. Don't steal all of them, or the PO will "accidentally" CAS you at the first opportunity. | Refueled using a jerry can, most immediately accessible through stealing them from the Condor. Don't steal all of them, or the PO will "accidentally" CAS you at the first opportunity. | ||
| Line 93: | Line 82: | ||
All types of UVs can be repaired using a welding tool. In the event that they survive long enough to run out of ammo, more can be ordered from the Engineering section of requisitions, though it must be installed manually. | All types of UVs can be repaired using a welding tool. In the event that they survive long enough to run out of ammo, more can be ordered from the Engineering section of requisitions, though it must be installed manually. | ||
Latest revision as of 19:42, 29 June 2024

|
This page is a part of the TGMC wiki.
TGMC is a project based on the CM-SS13 codebase. |
Welcome to using mobile machineries in TGMC! This guide will get you familiar with how to use each vehicles and ensure that you can beat the xenomorphs back to their hives!
You may be daunted by the unfamilar gadgets in front of you, but that's okay; everyone has to start somewhere.
What is important is knowing the responsibility of each vehicles. Not knowing what you need will have marines yell at you for being incompetent.
The Planes
Read Pilot Officer for info on planes
Installing modules
If you want to install a module or reload a weapon, you will need a powerloader, this is how you install a module, it works the same for ammunition:
- Right click the powerloader
 and click “Enter powerloader”
- Alternatively, you can clickdrag your sprite onto the powerloader.
- Move infront of the module and left-click on it, you can carry two modules, simply switch active hand to carry another one.
- Move to the right slot and click left click on it, that’s it, you installed a module.
Drop Pods
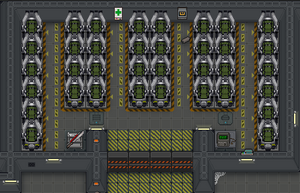
The Drop Pods serve as a rapid one-way deployment system for shipside marines to reach the field. Click with an empty hand to enter a pod, and the UI will automatically open, allowing you to input coordinates, verify your location, launch, or exit the pod. If you close it, you can reopen the menu through the tabs in the top right of your chat window.
Pods can only be launched after the Alamo first reaches the surface. Be sure not to launch before the shutters are down, or you'll likely get swarmed and instantly die.
The console at the entrance of the Drop Pod bay isn't just for show - it can launch all manned drop pods simultaneously, for coordinated strikes.

Drop Pods' UI
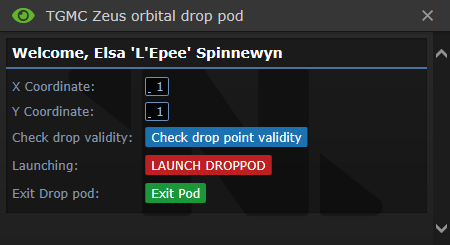
Communicate with your team in order to get viable drop pod coordinates. Set them by either manually inputting the X and Y coordinates in the relevant fields, or by dragging the field up and down to increase or decrease the number.
To make sure your selected area is viable to drop to, press the "Check drop point validity" button. It will warn you if the area is roofed, inside terrain, or otherwise inaccessible.
When ready, press the "Launch Droppod" button. Otherwise, you can exit with the "Exit Pod" button.

Don't tell anyone, but you can use the Webmap for accurate drop coords.
Drop Pods now have the ability to select a drop pod location by Minimap, just hit the icon in top left while you are sat in the pod to pull up the ground Minimap and see where all your friends are/dying at.
See Minimap to learn what each icon represents in the Minimap menu
Once you are satified with your location, click and it should say that location is locked. If it does not work that means the location is underground or in an area that cannot be landed in, try again.
After that, Hit the drop button and get ready to dive, Helldiver
Motorbike

The premier in marine transportation technology - besides the Alamo, Tadpole, and every other transport vehicle.
Allows full running-speed movement for one marine, upgradable to two with a sidecar, in exchange for fuel. Contains an internal storage bay for your convenience.
Refueled using a jerry can, most immediately accessible through stealing them from the Condor. Don't steal all of them, or the PO will "accidentally" CAS you at the first opportunity.
Unmanned Vehicles
Sometimes the best choice is not to put yourself on the firing line. Sometimes the AI wants a chance to shoot, too. Sometimes the Captain wants to kill Xenos, and the OB just isn't doing it. In these cases, the Unmanned Vehicle system shines.
UVs come in three chassis variants:
 Light chassis: High speed, 300 health.
 Medium chassis: Intermediate speed, 400 health.
 Heavy chassis: Low speed, 500 health.
These are combined with the cannon, which comes in two variants:
 Light cannon: 20 Damage, 0.5 Sunder
 Heavy cannon: 40 Damage, 5 sunder
These are ordered separately from the Engineering section of requisitions, and must be combined when the crates arrive.
The assembly can be driven automatically by the AI, or using a vehicle controller (Also orderable from requisitions). Note that AI control and Controller control are mutually exclusive; once one operator has selected the vehicle, it cannot change to the other operation type.
All types of UVs can be repaired using a welding tool. In the event that they survive long enough to run out of ammo, more can be ordered from the Engineering section of requisitions, though it must be installed manually.

