User:Foomf/Sandbox
Foomf's Basic Guide to the Hypertorus Fusion Reactor
The Hypertorus Fusion Reactor (HFR), otherwise known as the "Danger Donut", is a complicated piece of machinery that likes to explode if you are not careful. The main guide for the HFR can be found here: Guide to the Hypertorus Fusion Reactor. This guide is very thorough and complex. The info in it is good, but it's a bit daunting. This guide serves as a much more gentle onboarding for the HFR. It will get you competent enough to run it without blowing yourself up.
There's going to be a lot of over simplifications and arm waving in this guide. I'm sure someone can say "Ackshually..." to every sentence in here. If you want hard numbers and tons of depth, go read the main HFR guide (linked above). Everything in this guide is covered in more detail in the main guide.
Please Oh God Just Help Me Shut It Down Before It Explodes!
If you have found yourself on this page because you are near an HFR that is in the process of melting down and you want to avoid having a hole in your station... (WIP)
Why Run The HFR?
The purpose of the HFR is to produce rare and interesting gases. Despite being called a "fusion reactor", It does not produce energy! In fact it will consume a lot of energy.
The HFR also has a secondary purpose of being a stable source of high temperatures. This is very useful for some crystallizer recipes, like metal hydrogen.
An Overview Of The HFR Exterior

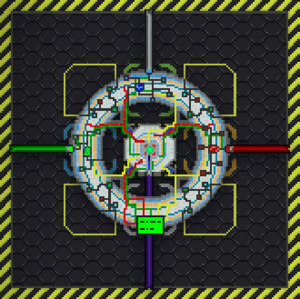
To the right is the HFR itself. The interface is to the south, the fuel input to the west, the moderator input to the north, and the waste output to the east. These can be switched around in whatever way is convenient for you. For instance, the waste output can be to the north, the moderator input to the west, etc. The large lights on the HFR will tell you what each side does:
- Green = Fuel Input
- Blue = Moderator Input
- Red = Waste Output
The coolant will always connect to the center piece from the south. Note that in the image on the right, the coolant line runs under the interface piece.
Fuel Input
This is where you input the fuel mix for the HFR. It is always going to be a 50/50 mix of something. The fuel has an impact on how much heat the reactor produces and what byproducts it makes. This is a one way input: gas only flows into the HFR from this connection.
Moderator Input
This is how you get moderator gas into the HFR. The purpose of the moderator gas will be explained in later section. This is a one way input: gas only flows into the HFR from this connection.
Waste Output
This is where your hard earned gases will come from. This is probably why you are running the HFR! This is a one way gas output: gas only flows out of the HFR from this connection.
Coolant
The coolant is one of the primary ways you will cool down the reactor. This is a two way input/output: gas will flow freely between the connected pipe and the internals of the reactor.
An Overview Of HFR Interface And Concepts

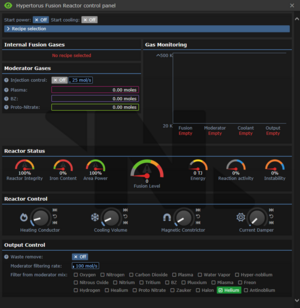
Start Power/Start Cooling
This is how you turn the HFR on and off. I'm sure there's a good reason why they are two separate buttons but I always press them together.
Recipe Selection
This is how you tell the HFR which gases to use for fuel. You can also use it to view all the different fusion mixes available. Inside this drop down menu, click the power button to the left of the fuel mix you want to use.
Internal Fusion Gases
The fuel is what is burning in the HFR to produce heat. Fuel is always a mixture of two different gases. There are a few different fuel mixes to produce, and they have different properties such as heat output, gas byproducts and rates of production. The main guide has a comprehensive list of the fuel mixes: Guide to the Hypertorus Fusion Reactor#Recipes
Once you have selected a recipe, you will be given access to the injection control. This allows you to control how fast gas is added to the HFR and how fast the gas is burned.
I try to have 2000 moles of each gas. If you have too much gas in your fuel, your reactor integrity will instantly drop to 0% and will pop like a balloon. The fuel mix will go in the air around you. Not a good time!
The fuel will get really, really hot. Hotter than the surface of the sun. Your fuel mix can easily go above 10,000,000 kelvin if you are not careful (room temp is 293 kelvin). You will probably be piping in room temperature fuel. At that temperature difference, your fresh fuel is essentially super cooled. This can be a great way to cool down the fuel in your reactor!
Moderator
The moderator has four purposes:
- Heat exchange: The moderator moves heat between the coolant and the fuel. The coolant and moderator exchange heat quickly, while the moderator and fuel exchange heat slowly.
- Gas production: The moderator is what is reacting in the HFR to produce interesting gases. The main guide has a comprehensive list of which gases moderators produce: Guide to the Hypertorus Fusion Reactor#The Moderator mix
- Fusion behavior: Right now the only gas that changes the behavior is Freon. If there is freon in the moderator then the reactor is easier to cool.
- Reactor repair: Right now the only gas that can fix the reactor is Healium. If there is healium in the moderator then the reactor will repair itself at fusion levels 5 and 6 only.
The injection control lets you configure how fast moderator is added to the HFR.
If BZ is in your moderator, you need to wear mesons or you will hallucinate (just like the supermatter crystal). At fusion level 6, mesons will no longer protect you from hallucinations.
Reactor Integrity
This dial indicates the "health bar" of your reactor. If this hits 0%, you will no longer have an HFR. You will have a hole in your station and the ire of your crewmates instead.
As long as the HFR is turned on (and fusion level 4 or lower), it will heal itself over time. At fusion levels 5 and 6, Healium will also increase the reactor integrity.
Iron Content
Iron damages the reactor. As this value goes up, your reactor integrity will go down. Iron gets added to the HFR at fusion levels 5 and 6. Iron gets removed from the HFR at fusion levels 4 and lower.
When the HFR loses power, 10% of iron is added per second. This is very bad!
Area Power
This is the reading of the APC of the room the HFR is in. As a rule of thumb, if this is less than 100%, time to shut the HFR down. If the HFR loses power, all of the knobs and buttons get set in a way that optimizes getting the reactor integrity to 0 as fast as possible! The only way to fix this is to restore power to the reactor so that you can change the knobs and buttons back to more sane values.
Fusion Level
The fusion level is directly related to the heat of your fuel. Hotter fuel = higher fusion level. Your fusion level is what decides which kinds of gases you are producing. Moderator gases and the fuel mix produce different things at different fusion levels. The HFR can only be turned off when it is at fusion level 0.
| Fusion Level | Min Temp (K) | Max Temp (K) | Iron Content | Power Use |
|---|---|---|---|---|
| 0 | 0 | 500 | Removes Iron | 50 KW |
| 1 | 500 | 1,000 (1e3) | Removes Iron | 100 KW |
| 2 | 1,000 (1e3) | 10,000 (1e4) | Removes Iron | 150 KW |
| 3 | 10,000 (1e4) | 100,000 (1e5) | Removes Iron | 200 KW |
| 4 | 100,000 (1e5) | 1,000,000 (1e6) | Removes Iron | 250 KW |
| 5 | 1,000,000 (1e6) | 10,000,000 (1e7) | Adds Iron | 300 KW |
| 6 | 10,000,000 (1e7) | No Max | Adds Iron | 350 KW |
Instability
When the fuel reacts, it produces heat. When the reaction is unstable, it loses heat instead. An unstable reaction cools down which is a great way to lower your fusion level. This is directly impacted by the current damper (see below). If the reaction is unstable, the moderator will no longer produce interesting gases!
Heating Conductor
The heating conductor controls how fast the HFR's fuel temperature changes. A high heating conductor value makes the fuel get hot very fast. If the reaction is unstable, a high heating conductor value makes the fuel cool down very fast.
Cooling Volume
The cooling volume dial controls how much coolant is inside the reactor. I turn this up when I want the coolant to have a greater impact on fuel temperatures.
Coolant is the main way to exchange heat between the HFR and the outside world. You want to choose a gas with a high heat capacity (see: Guide to Atmospherics#Physical Characteristics of Gases). Plasma is an easy choice for the coolant. The only gases with a higher heat capacity is Zauker, Freon, and Hypernoblium. I always use plasma.
Waste Removal
Turn this on to output your reaction byproducts (waste) from the HFR. This will NOT remove your fuel.
Moderator Filtering Rate
I almost always have this maximized. This is how fast your waste gases are removed from the HFR.
Filter From Moderator Mix
This lets you choose which gases to remove from your moderator mix. The fewer filters you have selected, the faster the filters will work.
The Basic Setup

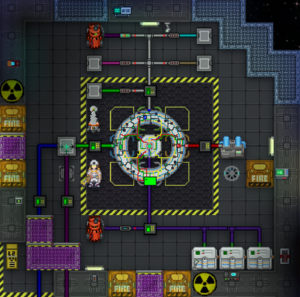
This is a basic HFR setup. It should not take too long to make, and will keep you safe for the basic plasma/oxygen fuel mix. No guarantees that this setup will work for other fuel mixes!
Fuel Input
Connect this to a gas mixer that mixes 50% plasma and 50% oxygen. It is important that both gases are the same temperature so that the gas mixer mixes as expected.
You always want these hooked up to their respective main gas tanks in atmospherics. This way you can flood the HFR with fresh fuel to cool it down in a hurry.
Moderator Input
There are only 5 moderators you are going to be using (plasma, bz, proto-nitrate, freon, healium), so I like to make a connector for each of them. 99% of the time I only use plasma and bz in my moderator, but I added all 5 connectors here for completion's sake.
Waste Output
The omni bluespace gas sender is incredible. It is a bottomless gas tank that accepts gases at any temperature. Even better, when you output gases from them, they are at room temperature! No need to worry about cooling down the output gases (which will be very hot).
Coolant
I fill the coolant pipe with as much plasma as I can. After that, the plasma canister is no longer needed. The coolant is going to get extremely hot while the HFR is running so you will have no hope of adding any more coolant once it is turned on anyways.
Three thermo-machines are enough to easily control a plasma/o2 fuel mix. Having them upgraded is nice but not critical to running the HFR. You can run it with T1 thermomachines if you want to. The better cooling, the faster you can produce interesting gases with the HFR.
You also need the thermomachines to quickly get yourself to fusion level 1 (by putting them in heating mode so you can quickly cross that 500 kelvin threshold).
Grounding Rod
If the HFR is melting down, it will start arcing lightning. When you're trying to get things under control, the last thing you want is to be constantly zapped (and possibly killed)!
Holofan Over APC/Doors
It is important to stress just how devastating losing power is to the HFR. This APC must be protected at all costs. One of the best things you can do is place a holo fan in front of it. If the HFR room becomes an inferno, this one holo fan will prevent the APC from getting destroyed. When the HFR is melting down, you do NOT want to be fumbling around with rebuilding the APC.
There are two main ways you can accidentally cause your HFR room to become an inferno that is not caused by the HFR itself exploding:
- You put too much fuel in the HFR. If the HFR gets too much fuel, it "pops" and the fuel spills out everywhere, and then probably ignites.
- You had a canister connected to the waste output or coolant line and forgot to turn on the shielding. Canisters will explode in an instant and spill their contents due to the insane pressures and temperatures the waste output pipe and the coolant output pipe can reach.
The door holofans are simply to prevent your HFR room inferno from ruining the rest of your atmospherics department's day. One less thing to think about when you are fire and the only thought going through your head is RUN.
Checklist
Here is a checklist that you should follow before turning on the HFR.
▢ Power grid has at least 350 KW excess? The HFR will use this much power so it is very important that you have this headroom.
▢ APC upgraded with bluespace power cell? The larger the power cell, the more time you will have to turn the HFR off when your room starts losing power.
▢ Inducer with bluespace power cell? If your APC does lose power, an inducer can you back up and running in a pinch.
▢ Holofans placed? Every HFR room comes with at least one holofan projector in it. I always use one to place the holofans, then place the projector in my emergency box.
▢ Grounding rod built? Hopefully you never need it, but if you do need it, it is invaluable.
▢ Coolant added to cooling pipes?
▢ Omni bluespace gas sender turned on and maximized? By default it is turned off. You need to turn it on and max the gas input.
▢ Does the rest of Engineering know? At least a heads up is appreciated so that engineering can monitor power. Nobody likes to be blindsided by a melting down HFR that they didn't know even existed. It will announce its integrity levels falling over comms.
▢ APC at 100% charge? If your APC is not charging, do not even consider turning on the HFR.
▢ Radiation protection? The HFR produces A LOT of radiation. Radiation protection is a must!
▢ Meson goggles? This is only needed if you plan on using BZ in the moderator mix.
▢ Are you safe? Odds are you're going to be the only one who knows how to run the HFR. If you are incapacitated, don't expect your crewmates to know how to turn it off.