Guide to Testing Your Pull Request: Difference between revisions
Sirryan2002 (talk | contribs) |
Shadeykins (talk | contribs) mNo edit summary |
||
| (One intermediate revision by one other user not shown) | |||
| Line 1: | Line 1: | ||
{{SidebarGithub}} | {{SidebarGithub}} | ||
Code by nature works ''as coded'' and not always ''as intended'', while you know that your code compiles and passes tests on your Pull Request you may not know if it breaks in edge cases or works fully in-game. In order to ensure your changes actually work, you will need to know how to '''Test Your Code'''. As part of this process, you will learn how to use various in-game debugging tools to fully utilize your changes in a test server, | {{Wip|assign=Sirryan2002}} | ||
Code by nature works ''as coded'' and not always ''as intended'', while you know that your code compiles and passes tests on your Pull Request you may not know if it breaks in edge cases or works fully in-game. In order to ensure your changes actually work, you will need to know how to '''Test Your Code'''. As part of this process, you will learn how to use various in-game debugging tools to fully utilize your changes in a test server, analyse variables at run-time, test for edge cases, and stress test features. This guide will also explain more advanced concepts and testing such as advanced proc calls, garbage collection testing, and breakpoints. | |||
==Prerequisites== | ==Prerequisites== | ||
Latest revision as of 17:00, 6 July 2024


Assigned to:Sirryan2002
Code by nature works as coded and not always as intended, while you know that your code compiles and passes tests on your Pull Request you may not know if it breaks in edge cases or works fully in-game. In order to ensure your changes actually work, you will need to know how to Test Your Code. As part of this process, you will learn how to use various in-game debugging tools to fully utilize your changes in a test server, analyse variables at run-time, test for edge cases, and stress test features. This guide will also explain more advanced concepts and testing such as advanced proc calls, garbage collection testing, and breakpoints.
Prerequisites
- You will need to first learn how to start contributing and successfully launch a local server.
- Give yourself host-level permissions on your local server (You should have access to every verb and tab available in-game).
- Have an open and patient mindset.
- Approach the QA process as if you're asking yourself questions and answering them by performing successful (or unsuccessful) tests.
Prep Work
In order to speed this up, especially for experienced devs, know what you're looking for and write down a list (mental lists work as well) of what you want to test. If you're only changing an attribute, list the interactions that attribute has with other functions so you remember to test each one. If you're adding a new atom, write down possible interactions that atom may have with other relevant atoms (think parent objects, tools, materials, machinery such as autholathes, antagonists).
Make your tests atomic. i.e. don't try and test everything at once, pick one specific thing (or closely related groups of things) to test on. If your item affects other items you want to test, consider restarting and using a clean round or properly cleaning up the test area.
Basic In-Game Tools
While mastery of these tools is not required, basic familiarity with them will be paramount to proper testing.
Game Panel
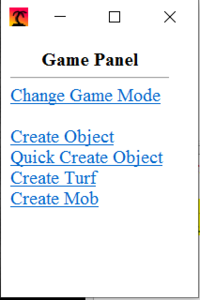
The Game Panel is a small menu that allows the user to set the game mode for the round or spawn in atoms (turfs, objects, mobs, etc). In order to access the Game Panel, you will need to click the Game Panel verb under the admin tab.

The Game panel has 5 buttons:
Change Gamemode - will allow the user to set the round game mode, this is only binding if the round has not started yet.
Create Object - Allows the user to spawn in any object, the search bar will return all type paths relevant to the search given
Quick Create Object - Allows the user to search for objects in a more specific scope (only guns, only mechs, etc)
Create Turf - Allows the user to change the turf they are directly over
Create Mob - Allows the user to spawn in a mob
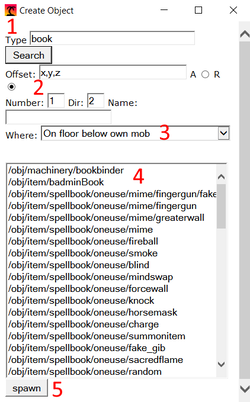
The most important buttons are the 4 create buttons. By clicking on them you can open up the game panel create menu. For beginners, there are 5 important aspects of the game panel that you will need to know (the other inputs and buttons are very sparsely used, and likely not needed in your case).
- The type path to search for, this input will tell the panel to query for any typepath that contains the given string, so if you searched for "book" it would return type paths such as "machinery/bookBinder", "spellbook/mime/oneuse", or "book/codex_gigas". Keep in mind this will return all type paths with the given string, since the game panel is tied to your client CPU usage, trying to search type paths with a query such as "item" or "mob" will return thousands of results and likely freeze your client for some time or crash it.
- The number or amount of the element you want to spawn, if you were spawning a book and typed in three, it would spawn three books.
- Where this object will spawn, generally you will want the default "On the floor below mob" or if you're a human, "in own mob's hands". If you're specifically trying to spawn the element inside another object, you can mark the object and use that option.
- The list of type paths to select, you will need to click the typepath to select it. Alternatively, if you want to spawn in multiple types at once, you can click-drag up to 5 type paths and spawn them all at once.
- The button that spawns stuff with the parameters you gave the panel.
Runtime Viewer
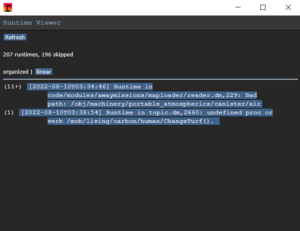
The runtime viewer interface is a menu that displays every runtime that occurred during the current round. It is available by clicking the View Runtimes verb under the debub tab.

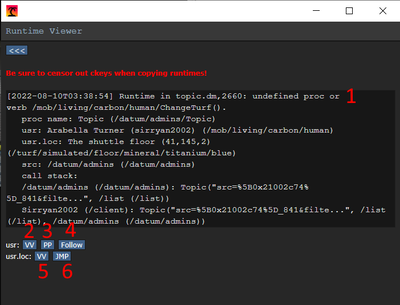
The runtime viewer displays a list of almost every runtime in a round, a few unimportant or repeated runtimes are skipped. Essentially, runtimes are errors that occur when the server is running (as compared to a build error that occurs when attempting to compile). Clicking on a runtime will open up more details about it.
- The runtime error. This will generally include information about the type of error (null reference, bad proc calls, etc), what file it occurred in, what line it occurred at, and information about the proc it occurred in. Some errors will also include "call stacks" or the procs called leading up to the error.
- user VV button, will open the view variables panel on the mob that caused the runtime
- user PP button, will open the player panel on the mob that caused the runtime
- user follow button, will force the user to follow/orbit the mob that caused the runtime
- loc VV button, will open the view variables panel on the loc (turf or thing that contains the object) of the object that caused the runtime
- loc jump button, will force the user to jump to the loc where the runtime occurred.
Does it Even Work?
The first step in testing is to see if your change spawns in/displays at all. This part of testing focuses solely on finding out when and where your changes break, not particularly how or why it breaks.
If your change is creation/removal of an atom. open up the Game Panel and see if the atom has been added/removed as a typepath, if it's not, make sure your code was actually compiled and check to either see if you A) actually defined a new typepath properly and have the file ticked in the DME file and B) you removed ALL instances where the type path is used (even proc definitions!). If your change is a map change, please see the Guide to Mapping.
Use the game panel to spawn your atom with the given type path:
- Does it appear?
- Is the sprite correct?
- Is the name/appearance/description of the atom correct?
Note: An Atom in DM refers to all elements of type "area", "turf", "object", or "mob." Each has different behaviors for spawning, deletion, and interaction so keep that in mind. Additionally, there will not be much reference/relevance in this section to "Area" type atoms..
Does it Work the Way You Want it to?
Test the attributes of your atom:
- If it has health, can you kill or break it?
- If it has a menu, can you open up and interact with the UI correctly, can you press buttons?
- If you added a special feature, can you activate it correctly?
- Does your new turf have proper atmospherics?
You may not have touched a certain section of code, but it's entirely possible that you broke it with a nearby change, check to make sure it still works the way it's supposed to (or even at all). For example, if you modified a variable inside a book object, can the barcode scanner still scan it into the library system? If you changed the way xenomorphs handle combat, will disablers, lasers, batons, etc still work the same way or function at all?
Be Concise and Specific
Your goal here is to break your change in every (relevant) way possible, use your change in every way you intended it to be used and then use it every way it wasn't intended to be used. However, this isn't to say you need to test every use case or test every single object that may be affected. As a contributor, you have limited time in your day to spend on coding, don't waste all of it trying out every different testing scenario. Here are a few tips to be efficient:
- Know the code so that you know what other objects or parts of a feature will be affected, then you have a mental list of things that need to be tested.
- Focus on testing one feature at a time, especially ones that you're focused on coding at the moment; This keeps your attention scoped to that feature so you can quickly make the needed changes and move on (this will help avoid "scope-creep.")
- If your feature is built on another feature working (i.e. your feature working depends completely on another feature working properly), test the dependency if your feature is breaking to ensure the point of failure isn't just a dependency breaking.
Why Doesn't it Work?
The previous question of "does it work" often answers itself just by spooling up a test environment, however, figuring out why things break is a much more difficult and in-depth task. This section will avoid getting into technical discussion and will instead explore conceptually how to begin understanding why your change is not working.
Does it Produce Errors?
Changes that clearly break often come saddled with a few runtimes which are errors that occur while the server is actively running. In your preferences tab, you can click the Toggle Debug Log Messages verb to toggle on debug message which will allow you to see runtimes pop up exactly when they happen in the chat box. You will need to do this every round unless you have a database properly set up. Additionally, you can view all runtimes in a round by clicking the view runtimes verb in the debug tab to open up the runtime viewer.
This will allow you to identify the errors your changes are producing and possibly even identify where, how, and what is breaking in your code. Do note that this will often not reveal larger issues with your code that is sourced from bad design decisions or unintentional effects.
Assertion Checking
Sometimes the values are incorrect for


