Difference between revisions of "Assemblies"
Sirryan2002 (talk | contribs) (updated intro) |
Sirryan2002 (talk | contribs) (section reformatting) |
||
| Line 2: | Line 2: | ||
==Signals== | ==Signals== | ||
[[File:RemoteSignaler.png|thumb|right]] | |||
Many machines across the station use signals to communicate which each other. You may even be surprised to learn that some machines such as Air Injectors/Gas Computers, wall buttons, and even our comms all use signals to communicate and function. But how does all of that work? | Many machines across the station use signals to communicate which each other. You may even be surprised to learn that some machines such as Air Injectors/Gas Computers, wall buttons, and even our comms all use signals to communicate and function. But how does all of that work? | ||
| Line 13: | Line 14: | ||
==Remote Signalers== | ==Remote Signalers== | ||
[[File: | [[File:WirePanelAttachUI.png|right|thumb]] | ||
Remote | Remote Signalers are devices from which you can send out signals from. You can set the frequency and code and you can choose to either manually activate it or attach it to another assembly to be activated once a condition is met. Additionally, you can set it to receive or send signals. As a receiver, if a signal is sent with the same frequency and code it is on, it will activate whatever it is attached to. | ||
===Attaching Remote Signallers to Machines=== | ===Attaching Remote Signallers to Machines=== | ||
Whenever you open up the wire panel of an airlock, [[APC]], air alarm, etc, there is a few options you have for each wire. You can cut or pulse it, but there is a third option called | Whenever you open up the wire panel of an airlock, [[APC]], air alarm, etc with a screwdriver, there is a few options you have for each wire. You can cut or pulse it, but there is a third option called <code>attach</code> next to the wire you wish to connect the remote sequencer to. If you click attach while holding a remote signaler, it will attach that signaler to that wire. Whenever the signaler is activated(as a receiver), it will pulse that wire like it was receiving a pulse from a multitool. | ||
This can obviously accomplish a myriad of things, such as remotely locking doors or disabling | This can obviously accomplish a myriad of things, such as remotely locking doors or disabling APC breakers. You can have as many signalers on a machine as there are available wires, however, you cannot put more than one signaler on a single wire. | ||
===PDA Signallers=== | ===PDA Signallers=== | ||
| Line 83: | Line 84: | ||
In the grand scheme of things, there are '''a lot''' of ways you can combine assemblies to accomplish different tasks using a variety of logical ciruits. It's really up to you to experiment to see what works. | In the grand scheme of things, there are '''a lot''' of ways you can combine assemblies to accomplish different tasks using a variety of logical ciruits. It's really up to you to experiment to see what works. | ||
Revision as of 15:35, 18 September 2021
Assemblies are components/devices that have been combined together that can either receive signals or send them out. Often they are configurated to activate upon a certain condition being met and to either activate another device or send out another signal. Assemblies are often connected to various machines around the station such as APCs or airlocks.
Signals
Many machines across the station use signals to communicate which each other. You may even be surprised to learn that some machines such as Air Injectors/Gas Computers, wall buttons, and even our comms all use signals to communicate and function. But how does all of that work?
Whenever an Assembly is activated and sends out a signal, it sends out that signal on a Frequency. Frequency comes in the form of numbers with odd decimals. For example, the frequency of a signal could be 101.3, 113.7, or 93.7. Since there are often multiple signals being sent on the same frequency there needs to be a way to differentiate the signals. This is where Codes come in. A code is just an accompanying number sent along with the signal that will further make the signal unique.
For example:
Signal 1: Frequency 101.3 Code: 4
Signal 2: Frequency 93.3 Code: 67
Anything on the same frequency and same code as the one described in Signal 1 will receive that signal and be activated, it will ignore all other signals.
Remote Signalers
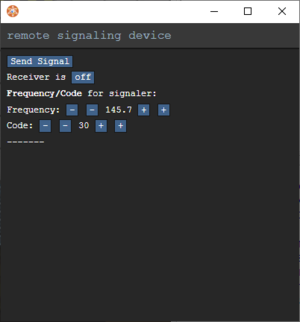
Remote Signalers are devices from which you can send out signals from. You can set the frequency and code and you can choose to either manually activate it or attach it to another assembly to be activated once a condition is met. Additionally, you can set it to receive or send signals. As a receiver, if a signal is sent with the same frequency and code it is on, it will activate whatever it is attached to.
Attaching Remote Signallers to Machines
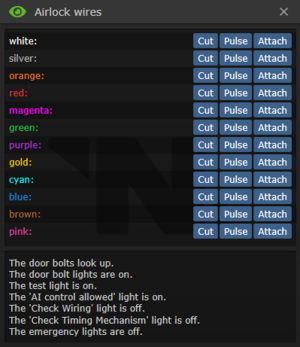
Whenever you open up the wire panel of an airlock, APC, air alarm, etc with a screwdriver, there is a few options you have for each wire. You can cut or pulse it, but there is a third option called attach next to the wire you wish to connect the remote sequencer to. If you click attach while holding a remote signaler, it will attach that signaler to that wire. Whenever the signaler is activated(as a receiver), it will pulse that wire like it was receiving a pulse from a multitool.
This can obviously accomplish a myriad of things, such as remotely locking doors or disabling APC breakers. You can have as many signalers on a machine as there are available wires, however, you cannot put more than one signaler on a single wire.
PDA Signallers
In addition to the normal remote signaler, you can also purchase or acquire a cartridge for your PDA that will allow you to turn it into a remote signaler. In Cargo you can purchase either the Generic Signaler cartridge or Signal Ace (Only the RD has the deluxe version) cartridge. You are able to send out any signal from your PDA with the limitation that it cannot act as a reciever
Devices
Assemblies
Assemblies are devices that have been combined together. For example, you could attach a timer to a remote signaller to send out signals on 30-second pulses. You can combine up to three devices into an assembly.
In order to combine devices into an assembly, you must first set the conditions/settings of each device. Then you will need to apply a screwdriver to both devices. Now you will need to hold one of the devices in your hand and click on the other device to combine them. You will finalize the assembly by once again applying a screwdriver. You can still mess with the setting on both while it is completed, however, it should work at this point.
When one part of an assembly receives a signal, it will activate the other part of the assembly. For example, if someone trips an infrared laser on an infrared emitter/remote signaller assembly, the remote signaller will be activated. Additionally, if Remote Signaller 1 on a Remote Signaller/Remote Signaller assembly receives a signal on its frequency/code, it will activate Signaller 2 which will send out a signal on its set frequency/code.
Logic
For an assembly to actually do something, you will need to have an Input assembly and an Output assembly. Your Input assembly will be a device connected to a remote signaller, such device must activate when a condition is met and therefore send out a signal via the remote signaller. There must be another remote signaller on that frequency attached to your output device. This device could be attached to an airlock or even another assembly.
In the grand scheme of things, there are a lot of ways you can combine assemblies to accomplish different tasks using a variety of logical ciruits. It's really up to you to experiment to see what works.


