Difference between revisions of "Creating your own paracode server"
Jump to navigation
Jump to search
Github
Sirryan2002 (talk | contribs) (replaced level-1 headers. Added rewrite template) |
|||
| (5 intermediate revisions by one other user not shown) | |||
| Line 1: | Line 1: | ||
{{Template:SidebarGithub}} | |||
==Download and Compiling== | |||
{{ | |||
==Download | |||
# Install BYOND and create an account at http://www.byond.com/ | # Install BYOND and create an account at http://www.byond.com/ | ||
# Checkout the source using [https://github.com/ParadiseSS13/Paradise Git] or download it directly from the [https://github.com/ParadiseSS13/Paradise/archive/master.zip ZIP button on Github] and extract it into a folder of your choosing. | # Checkout the source using [https://github.com/ParadiseSS13/Paradise Git] or download it directly from the [https://github.com/ParadiseSS13/Paradise/archive/master.zip ZIP button on Github] and extract it into a folder of your choosing. | ||
# Open '''paradise.dme'''. | # Open '''paradise.dme'''. | ||
# In the menu at the top, select Build > Compile. | # In the menu at the top, select Build > Compile. [[File:Compiling Paradise.png|300px|right]] | ||
#* Compile time depends on your computer specs. Expect to wait between 2–10 minutes. When it finishes you will see the following message: | #* Compile time depends on your computer specs. Expect to wait between 2–10 minutes. When it finishes you will see the following message: | ||
#*; ''saving paradise.dmb (DEBUG mode)'' | #*; ''saving paradise.dmb (DEBUG mode)'' | ||
#*; ''paradise.dmb - 0 errors, 0 warnings'' | #*; ''paradise.dmb - 0 errors, 0 warnings'' | ||
#* If you see any errors or warnings, something has gone wrong - possibly a corrupt download or the files extracted wrong. | #* If you see any errors or warnings, something has gone wrong - possibly a corrupt download or the files extracted wrong. | ||
# | |||
==Configuration== | |||
You will spawn as a !LOCALHOST! at this point. However, you can change your status as well. | |||
# Navigate to the config folder and copy all files from /config/example into the parent /config directory. [[File:Admin Config pathway.png|350px|right]] | |||
# Navigate to the <code>[admin_configuration]</code> section of /config/config.toml and add yourself under <code>admin_assignments</code>. Some available levels (from highest to lowest) are: '''Hosting Provider''' (recommended), '''Maintainers''', '''Game Admin''', '''Mentor'''. | # Navigate to the <code>[admin_configuration]</code> section of /config/config.toml and add yourself under <code>admin_assignments</code>. Some available levels (from highest to lowest) are: '''Hosting Provider''' (recommended), '''Maintainers''', '''Game Admin''', '''Mentor'''. | ||
#* The format is: | #* The format is: | ||
| Line 19: | Line 19: | ||
==Starting the Server== | ==Starting the Server== | ||
[[File:DreamDaemon.png|350px|right]] | |||
# To start the server, run the BYOND client, log in, and select File > "Start Dream Daemon..." from the menu. (May be better to run it separately as admin, as people have reported crashes) | # To start the server, run the BYOND client, log in, and select File > "Start Dream Daemon..." from the menu. (May be better to run it separately as admin, as people have reported crashes) | ||
# At the bottom of Dream Daemon, enter the path to your compiled paradise.dmb file. | # At the bottom of Dream Daemon, enter the path to your compiled paradise.dmb file. | ||
| Line 34: | Line 35: | ||
==Logging In== | ==Logging In== | ||
# In the BYOND client's menu, select | [[File:Bookmarks Paracode Server.png|400px|right]] | ||
# In the BYOND client's menu (upper right cog), select Open Location... > Add... | |||
# '''URL:''' 127.0.0.1:12345 | # '''URL:''' 127.0.0.1:12345 | ||
#*...where '''12345''' is the port you chose in the section above. | #*...where '''12345''' is the port you chose in the section above. Plug in other ports into 127.0.0.1:'''XXXXX''' to work as the URL. | ||
# '''Name:''' Test Server (or whatever you want to call it) | # '''Name:''' Test Server (or whatever you want to call it) | ||
# Click '''OK''' | # Click '''OK''' | ||
# Find your new '''Test Server''' bookmark in the Bookmarks menu and select it to start playing. | # Find your new '''Test Server''' bookmark in the Bookmarks menu and select it to start playing. | ||
#* Note: You can also click the yellow 'route' sign in Dream Daemon to connect to your server instantly. | #* '''Note''': You can also click the yellow 'route' sign in Dream Daemon to connect to your server instantly. | ||
==Updating== | ==Updating== | ||
[[File:Github Desktop Updating.png|400px|right]] | |||
# Download a new .ZIP from the Paradise Github repo (as explained in the first section above). | # Download a new .ZIP from the Paradise Github repo (as explained in the first section above). | ||
# Backup your /config folder. This folder stores your server configuration. | # Backup your /config folder. This folder stores your server configuration. | ||
| Line 48: | Line 52: | ||
# Copy your /config folder back into the new install, overwriting when prompted except if we've specified otherwise | # Copy your /config folder back into the new install, overwriting when prompted except if we've specified otherwise | ||
# Re-compile the game. | # Re-compile the game. | ||
'''OR (Recommended)''' | |||
# Create a GitHub account. | |||
# Clone the Paradise repository with a Git client like [[Guide to Contributing#Setting up Visual Studio Code|VSC]] or [[Guide to Contributing#Setting up & Using Github Desktop|Github Desktop]]. | |||
# Compile a new server to use from the cloned repository. | |||
# Update it periodically. If there is an issue with updates, '''Clean Compile''' Dream Maker after updating the repository. | |||
==MySQL Setup== | ==MySQL Setup== | ||
The SQL backend for the library and stats tracking requires a MySQL server. Your server details go in /config/config.toml under the <code>database_configuration</code> section, and the SQL schema is in /SQL/paradise_schema.sql. For further instructions, head on over to [[Setting up the Database]]. | The SQL backend for the library and stats tracking requires a MySQL server. Your server details go in /config/config.toml under the <code>database_configuration</code> section, and the SQL schema is in /SQL/paradise_schema.sql. For further instructions, head on over to [[Setting up the Database]]. | ||
{{Contribution Guides}} | {{Contribution Guides}} | ||
Latest revision as of 09:09, 27 November 2023

Download and Compiling
- Install BYOND and create an account at http://www.byond.com/
- Checkout the source using Git or download it directly from the ZIP button on Github and extract it into a folder of your choosing.
- Open paradise.dme.
- In the menu at the top, select Build > Compile.
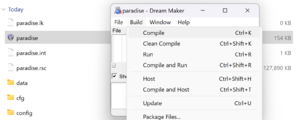
- Compile time depends on your computer specs. Expect to wait between 2–10 minutes. When it finishes you will see the following message:
- saving paradise.dmb (DEBUG mode)
- paradise.dmb - 0 errors, 0 warnings
- If you see any errors or warnings, something has gone wrong - possibly a corrupt download or the files extracted wrong.
- Compile time depends on your computer specs. Expect to wait between 2–10 minutes. When it finishes you will see the following message:

Configuration
You will spawn as a !LOCALHOST! at this point. However, you can change your status as well.
- Navigate to the config folder and copy all files from /config/example into the parent /config directory.
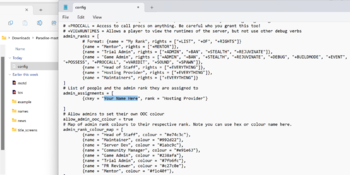
- Navigate to the
[admin_configuration]section of /config/config.toml and add yourself underadmin_assignments. Some available levels (from highest to lowest) are: Hosting Provider (recommended), Maintainers, Game Admin, Mentor.- The format is:
{ckey = "Your Name Here", rank = "Admin Rank"}
- Additional levels and specific commands accessible by each level can be seen in /code/modules/admin/admin_verbs.dm and, and permissions can be edited in the
admin_ranksconfig section.
- The format is:

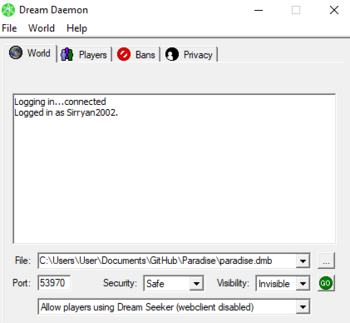
Starting the Server

- To start the server, run the BYOND client, log in, and select File > "Start Dream Daemon..." from the menu. (May be better to run it separately as admin, as people have reported crashes)
- At the bottom of Dream Daemon, enter the path to your compiled paradise.dmb file.
- Set Port to whatever port you like, in the range of 1-99999, making sure no other program is using that port.
- Note: If you are running it locally for testing, the port can be empty and one will be selected for you. However, choosing a port will prevent needing to edit your bookmark (below). A port number that works for almost all purposes is 53970.
- Security: (Trusted is recommended. You can use Safe mode if you prefer, but you'll be clicking alert windows when the server needs to edit the info.json every time it boots up.)
- Trusted mode allows the game to access files, run system commands, and perform other actions without asking for permission. This is usually not a good idea except for games that you have created yourself.
- Safe mode is the default. File access is allowed within the same directory as the world's .dmb file, and any directories underneath that one. Most actions such as running a system command require your approval.
- Ultrasafe mode means that nothing that could affect your system in any way will be allowed without your permission. For games that use savefiles, this is usually not desirable.
- Visibility: (Invisible is recommended)
- Public mode is the default. The game will be seen by everyone on the hub.
- Private mode means your friends on the pager will see your game. However if they are logged in, it will also be visible on their pager.
- Invisible mode prevents the game from appearing on the hub or pager.
- Press the green GO button in the bottom-right. This step may take up to 10 minutes to complete as the world loads. If your Dream Daemon stops responding, simply wait longer.
Logging In

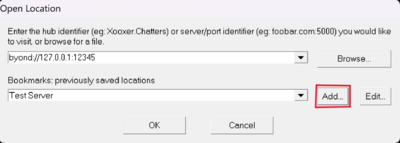
- In the BYOND client's menu (upper right cog), select Open Location... > Add...
- URL: 127.0.0.1:12345
- ...where 12345 is the port you chose in the section above. Plug in other ports into 127.0.0.1:XXXXX to work as the URL.
- Name: Test Server (or whatever you want to call it)
- Click OK
- Find your new Test Server bookmark in the Bookmarks menu and select it to start playing.
- Note: You can also click the yellow 'route' sign in Dream Daemon to connect to your server instantly.
Updating

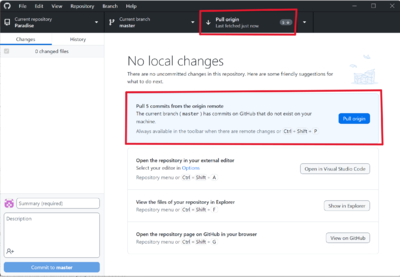
- Download a new .ZIP from the Paradise Github repo (as explained in the first section above).
- Backup your /config folder. This folder stores your server configuration.
- Extract the new files (preferably into a clean directory, but replacing existing files should work fine).
- Copy your /config folder back into the new install, overwriting when prompted except if we've specified otherwise
- Re-compile the game.
OR (Recommended)
- Create a GitHub account.
- Clone the Paradise repository with a Git client like VSC or Github Desktop.
- Compile a new server to use from the cloned repository.
- Update it periodically. If there is an issue with updates, Clean Compile Dream Maker after updating the repository.
MySQL Setup
The SQL backend for the library and stats tracking requires a MySQL server. Your server details go in /config/config.toml under the database_configuration section, and the SQL schema is in /SQL/paradise_schema.sql. For further instructions, head on over to Setting up the Database.
| Contribution Guides | |
|---|---|
| General | Guide to Contributing, Game Resources category, Github Glossary |
| Setting up a server | Setting up the Database, Creating your own paracode server |
| Coding | Understanding SS13 Code, SS13 for experienced programmers, Text Formatting |
| Mapping | Guide to Mapping, |
| Spriting | Guide to Spriting, |
| Wiki | Guide to Editing the Wiki |