User:Sirryan2002/GradingTest: Difference between revisions
Sirryan2002 (talk | contribs) No edit summary |
Sirryan2002 (talk | contribs) |
||
| Line 44: | Line 44: | ||
** Bolding and text-scaling should be reserved for headers, disclaimers, or important notes. You should never be using bold text in the middle of a sentence unless absolutely necessary. | ** Bolding and text-scaling should be reserved for headers, disclaimers, or important notes. You should never be using bold text in the middle of a sentence unless absolutely necessary. | ||
<div class="toccolours mw-collapsible mw-collapsed" style="width:99%"> | |||
===Creating a Page=== | ===Creating a Page=== | ||
As new content is added to the game, something may be added that is unique enough to justify the feature having its own wiki page. Or perhaps you are just creating your user page so you can let people know who you are or have a playground for testing wiki code. | |||
<div class="mw-collapsible-content"> | |||
[[File:Creating a Page From Search Menu.png|right|thumb]] | [[File:Creating a Page From Search Menu.png|right|thumb]] | ||
'''There are two methods from which to begin creating a page:''' | '''There are two methods from which to begin creating a page:''' | ||
| Line 64: | Line 66: | ||
*** Userpages are not subject to editing from other contributors (please don't edit other people's userpages). | *** Userpages are not subject to editing from other contributors (please don't edit other people's userpages). | ||
*** However, userpages that contain dead links or otherwise generate issues may be edited at the discretion of the people maintaining the wiki. | *** However, userpages that contain dead links or otherwise generate issues may be edited at the discretion of the people maintaining the wiki. | ||
</div></div> | |||
<div class="toccolours mw-collapsible mw-collapsed" style="width:99%"> | |||
===Editing An Article=== | ===Editing An Article=== | ||
Since wiki articles require many edits to keep up to date and add all content, its important to know how to edit an article. To begin editing an article, one must view the page they want to edit and then click the edit button (it is next to the "read" and "view history" buttons).<br> | |||
<div class="mw-collapsible-content"> | |||
[[File:Editing a page from read tab.png|right|thumb]] | [[File:Editing a page from read tab.png|right|thumb]] | ||
[[File:Page Editing Tab.png|border|640px|This is the Article editor tab, you can add the wikicode in the textbox, add a summary in the text input, preview your edits with the show preview button, and save the page with the blue button!]]<br> | [[File:Page Editing Tab.png|border|640px|This is the Article editor tab, you can add the wikicode in the textbox, add a summary in the text input, preview your edits with the show preview button, and save the page with the blue button!]]<br> | ||
'''Breakdown of the Editing Tab''' | '''Breakdown of the Editing Tab''' | ||
| Line 76: | Line 79: | ||
* '''4''': The Summary box is what will be displayed next to your edit in the article history tab, it doesn't have to be terribly descriptive but it does need to be accurate | * '''4''': The Summary box is what will be displayed next to your edit in the article history tab, it doesn't have to be terribly descriptive but it does need to be accurate | ||
You can now alter the page, edits will not save until you hit the save button don't worry! If its your user page, do whatever you want to it. If its an existing page, make sure you're preserving the quality of the page and improving it! Once You've filled out the page, write your reason for creating the page, and hit the save button. Your page should now be saved! | You can now alter the page, edits will not save until you hit the save button don't worry! If its your user page, do whatever you want to it. If its an existing page, make sure you're preserving the quality of the page and improving it! Once You've filled out the page, write your reason for creating the page, and hit the save button. Your page should now be saved! | ||
</div></div> | |||
<div class="toccolours mw-collapsible mw-collapsed" style="width:99%"> | |||
===Uploading a File=== | ===Uploading a File=== | ||
How to implement a file/image that has already been uploaded onto your article has already been discussed in this guide. However, what if a contributor needs to include a file that has not been previously uploaded to the wiki before? There are a few ways to begin uploaded a brand new file to the wiki: | |||
<div class="mw-collapsible-content"> | |||
[[File:Red File Link.png|right|thumb]] | [[File:Red File Link.png|right|thumb]] | ||
[[File:Upload File Sidebar.png|right|thumb]] | [[File:Upload File Sidebar.png|right|thumb]] | ||
* Click on a File: link that is red | * Click on a File: link that is red | ||
* Click ''Upload File'' under the Tools section in the left sidebar | * Click ''Upload File'' under the Tools section in the left sidebar | ||
| Line 99: | Line 105: | ||
Uploading an updated file to an already existing file is much the same as uploading a new file, the process to get there is slightly different. You will need to go to the files page, either by searching it in the search bar or clicking the file in an article and then click the "Upload a new version of this file" button.<br> | Uploading an updated file to an already existing file is much the same as uploading a new file, the process to get there is slightly different. You will need to go to the files page, either by searching it in the search bar or clicking the file in an article and then click the "Upload a new version of this file" button.<br> | ||
[[File:Upload a New Version Tab.png|580px|border]] | [[File:Upload a New Version Tab.png|580px|border]] | ||
</div></div> | |||
==Basic Wiki Syntax== | ==Basic Wiki Syntax== | ||
Revision as of 21:06, 9 May 2022
Hello and welcome to Paradise Station's Wiki. You are likely a prospective wiki contributor wondering how exactly you can contribute to our server wiki. Before making significant changes, contributors should read through our Wiki's Rules. The Guide to Wiki Editing seeks to outline how our wiki is structured, how one can make edits on our wiki, where contributors should be focusing their efforts, how to make an effective and useful edit, and finally how to begin writing quality articles.
Wiki Rules
This is the official policy for the Paradise Station Wiki. Violations of these rules will result in a revocation of wiki editing privilege's.
- Paradise Station Server Rules extend to the wiki, a violation of those rules is considered a violation of wiki rules.
- Page Vandalism is not allowed. Page Vandalism is editing a page in an intentionally disruptive or malicious manner. Vandalism includes any addition, removal, or modification that is intentionally nonsensical, misinformative, or degrading in any way.
- Edit Wars and reactionary article revisions are not permitted. Conflicts between contributors should be immediately be discussed between both parties and brought to wiki admins if a solution cannot be reached.
- Hostility towards another contributor or players in any context on the #Wiki-Development channel on discord is strictly prohibited.
- Large-scale edits to the wiki (10+ non-minor edits in quick succession) without first giving notice/discussion in the #Wiki-Development channel on discord is heavily discouraged
- Lore pages (except for grammatical/spelling corrections) are not to be edited without first contacting a Wiki Admin and getting approval from Server Heads of Staff
What is a Wiki and How Does it work?
At its core, the Paradise Station Wiki is a website that allows collaborative editing of its content and structure by its users. It serves to document our server's game mechanics and features in an easy to read and understand way so that information is digestible and available to our playerbase. Most importantly, it no only makes information available, but also organizes it in a way that a player can find what they're looking for with relative ease. If it is available in-game, a player should be able to find out more about it through our wiki.
Our wiki is not automatically updated, in order to stay up date, a community member must update it every time a Pull Request (that changes a feature) is merged into our codebase. Since the wiki has a tremendous amount of content, it requires the effort of many community members to keep it up to date and to completely populate its contents. As of the time you are reading this article, the wiki is likely not 100% up to date, and all content that should be added is still not completely there. That is where non wiki-contributing members of our community step in, they make their first edit! First time contributors shouldn't worry about whether or not their first edit adheres to our wiki editing standards, instead they should be focused on learning the mechanics of wiki editing. If you are worried about messing up something, just make an edit on your user page!
Making Edits
Anytime the wiki is changed, it must be edited by a wiki editor. The only restriction for someone to edit the wiki is to be a forums member and login with their forum credentials. Other than our wiki rules, there is NO restrictions on who can edit the wiki or who is "encouraged/discouraged" from editing the wiki. Go wild! Since editing the wiki can come in different forums based on the action you wish to perform, it has been broken down into multiple sections detailing all the ways one can affect change on the wiki.
If you're concerned weather or not your edit went through, you can check Recent Changes to see if your edit went through. This page is also a good tool to see where edits are being made on the wiki currently and how development has been going for the last 30 days!
General Pointers
This is simply a quick list of introductory wiki editing guidelines for our Wiki.
If you're ever uncertain about something, feel free to ask in the #wiki-development channel on our Discord.
General Wiki Etiquette
- Capitalize links and link names. This fits in better with how the Wiki supports article names at a software level, and proper nouns are supposed to be capitalized anyway.
- Not every reference needs to be a link unless it's for internal navigation. Link the first couple references to another page, but refer to it in plain-text further down the page.
- Do not use external links. Information should be contained on the wiki itself both for convenience and security purposes. There are a limited number of exceptions to this, such as with rules.
- After performing an edit, please fill out a general statement (it can be as few as 2 words) to let people know what you did.
- Minor edits are for things like typos, missing punctuation, or minor grammatical quibbles. Anything larger than that is not a minor edit.
- This wiki uses proper British/Canadian English wherever possible. While using American spelling is fine, do not make edits to correct British/Canadian spelling to American spelling.
Wiki Guidelines/Editing Tips
- Keep on subject. Try to keep articles related to the title. If you feel like you're going off on a tangent, try linking to a new article.
- Several pages use standardized colour schemes, structure, and templates. If you're creating a new page, please follow the structure/colours/templating of similar existing pages.
- Keep header names short and to the point. Lengthy headers make the Table of Contents ridiculously and needlessly wide.
- If you change a page's headers, make sure to click the "What links here" button on the sidebar and fix any potentially broken redirects.
- If information is highly important/not easy to find, you should consider making a redirect for likely search terms. Redirects look like this: #REDIRECT[[pagename]]
Wiki Humour/Bolding
- Please refrain from using strikethrough, random bolding, scaled up text, or making excessive random jokes.
- We strive to keep the wiki as a to-the-point and semi-serious resource. The occasional clever joke in an article is fine, constant strikethrough humour is not.
- Bolding and text-scaling should be reserved for headers, disclaimers, or important notes. You should never be using bold text in the middle of a sentence unless absolutely necessary.
Creating a Page
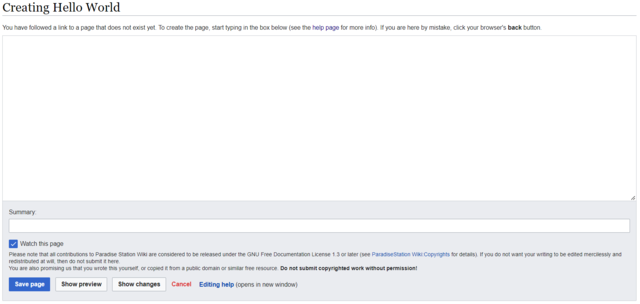
As new content is added to the game, something may be added that is unique enough to justify the feature having its own wiki page. Or perhaps you are just creating your user page so you can let people know who you are or have a playground for testing wiki code.
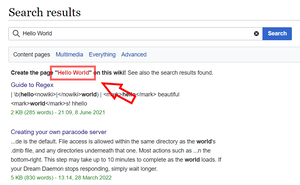
There are two methods from which to begin creating a page:
- If there is a red link anywhere on the page (such as your username in the top right), you can click on it and it will take you to the page creation tab.
- Type the name of the page you wish to create in the search bar in the top right and press enter. You will then need to click the red link with the name of the page you wish to create right under the search bar on the page.
You can now add whatever you want to the page. If its your user page, introduce yourself! Learn how to link your forum profile and discord profile! If its a content page, feel free to put in a summary of what you want players to know about the topic. If you want to see a page created about something but don't know how or want to fill it out, just put "{{Stub}}" as the contents. Once You've filled out the page, write your reason for creating the page, and hit the save button. Your page should now be saved!
NEW PAGE POINTERS:
- Create new pages only for legitimately new content. IE: Was a new and complicated system reported that needs its own page? Was a new antagonist added?
- If a new page was added, add links to it in the primary navigation pages such as "Guides" (people can't find it otherwise).
- Do not create new pages for testing purposes. This inflates our article count and they can be navigated to through 'Random page.'
- If you need to test something, use your userpage. For instance, if your username is NeoTokyo, navigate to User:NeoTokyo and create a page there.
- Userpages are not subject to editing from other contributors (please don't edit other people's userpages).
- However, userpages that contain dead links or otherwise generate issues may be edited at the discretion of the people maintaining the wiki.
- If you need to test something, use your userpage. For instance, if your username is NeoTokyo, navigate to User:NeoTokyo and create a page there.
Editing An Article
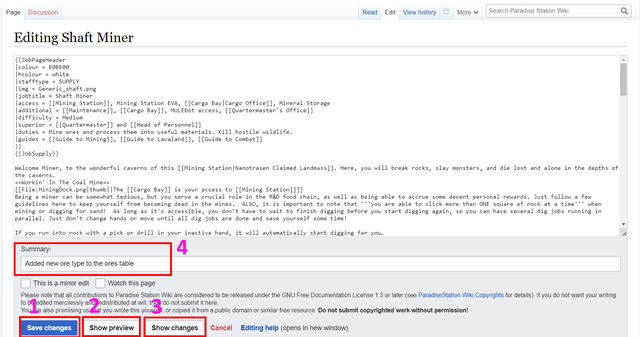
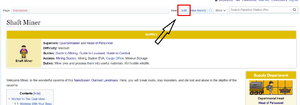
Since wiki articles require many edits to keep up to date and add all content, its important to know how to edit an article. To begin editing an article, one must view the page they want to edit and then click the edit button (it is next to the "read" and "view history" buttons).
- 1: The Save Changes button does what it says on the package, it will commit your change to the page (don't worry you can revert it later if you want).
- 2: The Show preview button will show you what the code in the box will display to the reader exactly, always preview edits before committing
- 3: The Show changes button will compare the old code to your inputted code to display the difference between them
- 4: The Summary box is what will be displayed next to your edit in the article history tab, it doesn't have to be terribly descriptive but it does need to be accurate
You can now alter the page, edits will not save until you hit the save button don't worry! If its your user page, do whatever you want to it. If its an existing page, make sure you're preserving the quality of the page and improving it! Once You've filled out the page, write your reason for creating the page, and hit the save button. Your page should now be saved!
Uploading a File
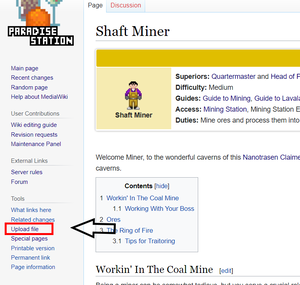
How to implement a file/image that has already been uploaded onto your article has already been discussed in this guide. However, what if a contributor needs to include a file that has not been previously uploaded to the wiki before? There are a few ways to begin uploaded a brand new file to the wiki:
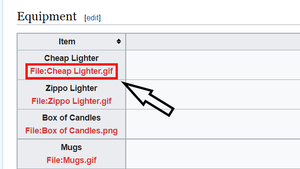
- Click on a File: link that is red
- Click Upload File under the Tools section in the left sidebar
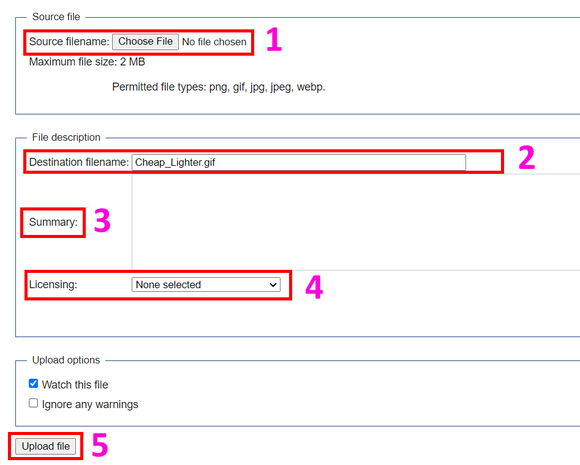
Breakdown of the File Upload Tab:
- 1: Choose file button, will open up file explorer and you can choose a file to upload
- 2: Destination File name, allows you to set the name of the file ("File:" namespace prefix is automatically added dw), the file type declaration must be at the end AND match the chosen file's file type.
- 3: Summary, just a light description of the file, can be useful to add keywords for searching later if the file name isn't terribly descriptive
- 4: Licensing, you must choose a license when uploading a file (please see license guidelines below)
- 5: Upload file, will commit the file to the wiki, process will automatically stop if A) there is no specified file name or uploaded file B) the file type and file name type do not match C) you are uploading a duplicate of another existing image D) something else went horribly wrong
Licensing Your Image
- You are required to select an appropriate license for your image.
- CC-BY-SA is for game files.
- CC-BY-NC-SA is for game files in the goon folder.
- GFDL 1.3+ is for wiki-specific files.
Uploading a New Image to an Existing File
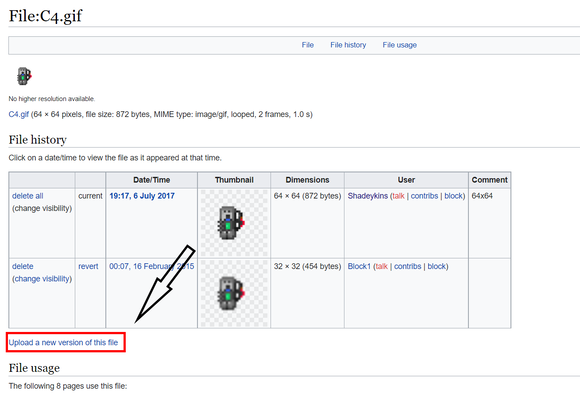
Uploading an updated file to an already existing file is much the same as uploading a new file, the process to get there is slightly different. You will need to go to the files page, either by searching it in the search bar or clicking the file in an article and then click the "Upload a new version of this file" button.
Basic Wiki Syntax
The syntax available to wiki contributors is not usually well presented so a repository of tutorials and information is needed here. This provides the most basic tools a wiki contributor will need in order to fully edit the wiki. 99% of the time, the average wiki contributor will not need more than this (in addition to templates later).
Text Formatting
Text by itself is extremely boring and often hard to read, so you can use text formatting to make your words really POP!
| Format Type | Usage | Output |
|---|---|---|
| Bold | Use this to bring attention to important text '''This text is bold''' |
This text is bold! |
| Italic | Use this to enounciate certain words ''This text is italicized!'' |
This text is italicized! |
| Headings | Use this to declare a section of your article and organize it
==Level 2== ===Level 3=== ====Level 4==== =====Level 5===== ======Level 6 ====== |
Level 2 Level 3 Level 4 Level 5 Level 6 |
| Paragraphs | You can designate sections of text as paragraphs which will for a linebreak before and after that section, you can also apply some more advanced formatting through Styles with it. <p> This is a paragraph of text! </p> |
This is a paragraph of text! |
| Bullet Lists | This is how you create bullet lists
*Item 1 * Item 2 ** Item 2.1 ** Item 2.2 * Item 3 ** Item 3.1 *:- Definition |
|
| Numbered Lists | This is how you create numbered lists
#Item 1 # Item 2 ## Item 2.1 ## Item 2.2 # Item 3 ## Item 3.1 |
|
| Preformatted Text | Use this to preformat text with a certain, this will alos allow you to write anything within the pre blocks without the wiki recognizing it as text formatting.
<pre>This text is preformatted to be the default font and style, <b>Things aren't bolded</b> or <i>Italicized</i>!!!</pre> |
This text is preformatted to be the default font and style, <b>Things aren't bolded</b> or <i>Italicized</i>!!! |
| Comments | Use this to leave important notes/messages to people editing the page. Comments do not show up when you view the wiki page and are only visible in the page editor.
<!--This is a comment, to whoever is reading this --> The Fitness Gram Pacer Test is a multi-stage aerobic exercise... |
The Fitness Gram Pacer Test is a multi-stage aerobic exercise... |
| Nowiki | The nowiki block makes it so that any formatting within the block is ignore and is instead displayed as regular text. <nowiki><b>This is bold!<b> this is a burger: [[File:Burger.png]]</nowiki> |
<b>This is bold!<b> this is a burger: [[File:Burger.png]] |
References
It is very important the articles link to each other so we have a web of information. In order to do this, we can reference articles and link keywords to those articles.
The most obvious way to do this is by typing [[Article Name]]
For example, you could link to Space Law by typing[[Space Law]]You can also link the article and change the link text. If you wanted to still link to space law but instead have the link be Legal Suggestions then you would have to use the syntax below. The two parameters for images is the Page Name and the Link Text --> [[Page Name|Link Text]]
[[Space Law|Legal Suggestions]]
Referencing Nuances
As a general note, you should always add spaces after references as it will include any characters that are next to it. So if you write [[Space Law]]textextext It will output as Space Lawtextextext.
If you wanted to do something like SMES's where you have characters directly next to the link then you would have to add the <nowiki /> tag to it --> [[SMES]]<nowiki />'s
If you want to link to an image rather than embedding it you will need to add a ':' colon before the name. For example, I can reference File:Burger.png without the image embedding itself by doing:[[:File:Burger.png]]
If you want to link to something outside of the Main: Namespace (if you're not sure what a namespace is, go here, but for now all you need to know is that all general users will be reading are in the Main Namespace) you will have to specify which namespace the article is in before you link it.
For example if I wanted to link to my user page:User:Sirryan2002 I cannot just use [[Sirryan2002]] because it will automatically default to the main namespace -> [[Main:Sirryan2002]] which does not exist. I will have to instead specify which name space I'm searching in. For the user's name space I will specify User[[User:Sirryan2002]]
Referencing Subsections
Sometimes you don't want to just link to an article, you want to link to a specific point in that article.
By adding a hashtag '#' to the end of a page name in your link you can specify where you want to go in that article. You can do this for any subsection in an article.
If I wanted to link this to Crime Codes References on the Space Law page. All I would have to do is specify it like so:[[Space Law#Crime Codes Quick Reference]]If the area you're referencing is in the article where the link is you can shorten the syntax. For example if I was on the Space Law page and I wanted to link a certain word to a subsection/anchor all I would have to do is use a '#' and write the subsection name:
[[#Crime Codes Quick Reference]]
Anchors
An Anchor is a defined place within in a page that you can link people to. They work much like headings where you can link people to them:[[Page Name#Anchor Name]].Infact, all headings have anchors attached to them! On our wiki we have Template:Anchor which allows us to create anchors extremely easily. What you will need to do is find the area you want someone to be taken to and place the anchor directly next to it via
{{Anchor|Anchor_Name}}
If I wanted to create an anchor right -> here <- all I would have to do is this: If I wanted to create an anchor right -> here{{Anchor|AnchorExampleSpot}} <-
now if you click on #AnchorExampleSpot it should take you directly to the anchor.
External References
Occasionally you will need to reference a link outside of the Wiki. This is often seen in articles that are guides to spritiing/code stuff or in our rule pages. Bottom line, you will rarely ever have to use an external reference and it should be avoided. If you ever do need to add an external link, it is a lot like referencing an internal article.
You will needs to use one opening square bracket '''[''' and one closing square bracket ''']''' Inbetween you will need to put the link, add a space after the link and define the text for the link
[https://www.paradisestation.org/ Paradise]
This outputs: Paradise
Images
Images are extremely important for our wiki, without them people wouldn't know what icons/mobs would look like or get a visual representation of what they're supposed to do.
In order to use an image you must utilize the [[File:]] synax.
For example, if you want to use Burger.png: ![]() then you must specify [[File:Burger.png]]. This will make Burger.png appear wherever you declare this.
then you must specify [[File:Burger.png]]. This will make Burger.png appear wherever you declare this.
However, in order to make images useful to us, we need to format that in a way that is easy to understand and see. We can add parameters to our image by utilizing the pipe '|' character. If you want your image to a certain size and make it link to another page you can specify it as [[File:Burger.png|64px|link=Space Law]]. There's a ton of parameters you can use but the most important ones are listed below.
Tables
Put data and shit into tables cause it helps readers digest information more betterer'
A wikitable always has to be wrapped by curly brackets and a pipe bracket
{|
All the content goes here
|}
Below from left to right is Table Syntax, an example table in final form, and example code for a table.
| Syntax | What it does |
|---|---|
| {| | Start a table - required |
| |} | End a table - required |
| |+ | Add a definition/title to the table |
| |- | Starts a new row |
| ! | Creates a Header Cell |
| | | creates a new cell |
| Header Cell | Header Cell | Header Cell |
|---|---|---|
| Header Cell | Cell | Cell |
| Header Cell | Cell | Cell |
| Header Cell | Cell | Cell |
| Header Cell | Cell | Cell |
| Header Cell | Cell | Cell |
| Header Cell | Cell | Cell |
{|class="wikitable"
|-
! Header Cell
! Header Cell
! Header Cell
|-
! Header Cell
| Cell
| Cell
|}
Table Classes
You should never go with the default table setup because it has no border or lines to break up cells. In order to give our tables fancy UI we have to declare what class it is.
We always do this at the beginning directly after the table start syntax The wikitable class gives our tables borders/outlines with grey backgrounds for header cells
| Header Cell | Header Cell | Header Cell |
|---|---|---|
| Header Cell | Cell | Cell |
{|class="wikitable"
|-
! Header Cell
! Header Cell
! Header Cell
|-
! Header Cell
| Cell
| Cell
|}
The mw-collapsible class makes it so you can collapse the table(have to include wikitable class)
| Header Cell | Header Cell | Header Cell |
|---|---|---|
| Header Cell | Cell | Cell |
{|class="wikitable mw-collapsible"
|-
! Header Cell
! Header Cell
! Header Cell
|-
! Header Cell
| Cell
| Cell
|}
The mw-collapsed starts a table with a mw-collapsible class in the collapsed state.
| Header Cell | Header Cell | Header Cell |
|---|---|---|
| Header Cell | Cell | Cell |
{|class="wikitable mw-collapsible mw-collapsed"
|-
! Header Cell
! Header Cell
! Header Cell
|-
! Header Cell
| Cell
| Cell
|}
The Sortable class allows you to make your columns sortable alphabetically, numerically, or by date. Additionally, by defining a row with class="unsortable" you can make it so that row isn't sortable.
| Alphabetic | Numeric | Date | Unsortable |
|---|---|---|---|
| d | 20 | 2008-11-24 | This |
| b | 8 | 2004-03-01 | column |
| a | 6 | 1979-07-23 | cannot |
| c | 4.2 | 1492-12-08 | be |
| e | 0 | 1601-08-13 | sorted. |
{| class="wikitable sortable"
|-
! Alphabetic
! Numeric
! Date
! class="unsortable" | Unsortable
|-
| d || 20 || 2008-11-24 || This
|-
| b || 8 || 2004-03-01 || column
|-
| a || 6 || 1979-07-23 || cannot
|-
| c || 4.2 || 1492-12-08 || be
|-
| e || 0 || 1601-08-13 || sorted.
|}
Cell Size Formatting
You can define the size of a cell by using colspan and rowspan.
| col1 | col2 | col3 | col4 |
|---|---|---|---|
| row1 | A | C | |
| row2 | AA | BB | CC |
| row3 | AAA | BBB | CCC |
| row4 | AAAA | CCCC | |
{| class="wikitable" style="text-align: center;"
!col1
!col2
!col3
!col4
|-
!row1
| colspan="2" | A
|C
|-
!row2
|AA
|BB
|CC
|-
!row3
|AAA
| rowspan="2" | BBB
|CCC
|-
!row4
|AAAA
|CCCC
|}
Table Style
Without defining the style of your table, it will look rather barebones. Most pages on this wiki have a color theme to them so it's important to know how to do this.
Whenever you're defining the style (aka how it looks) of a table you will need to declare it using the style="" syntax.
However, what do you put inbetween those quotations marks? Well the answer isn't the same for all the style options you have with HTML. For example, if you want to make background color of the table CadetBlue you would have to do this:
{|class="wikitable" style="background-color:CadetBlue;"
|-
| Cell
| Cell
| Cell
|-
! Header Cell
| Cell
| Cell
|}
Notice how the there is a semi-colon ';' after it. You must use semicolons to separate each attribute you use and to end the string.
For more information on what attributes there are for styling go Here.
Depending on what you're trying to do, you can style different parts of a table. To style the entire table, your style will have to go directly after where you define the class of the table:
{|class="wikitable" style="text-align:justify;"
|-
| Cell
| Cell
| Cell
|-
! Header Cell
| Cell
| Cell
|}
To Style Individual Cells you will need to define the style of the cell and then use the '|' character after which you can then write the content that would go into the cell. Additionally, you can do this to header cells "!" in the sameway.
{|class="wikitable"
|-
! style="color:blue; text-weight:bold;" | This Header Cell is Styled!
| Cell
| Cell
|-
! Header Cell
| Cell
| style="text-align:left" | This Cell is also Styled!
|}
To Style Rows you will need to define the style after you declare the row with 'the |-' character
{|class="wikitable"
|-
| Cell
| Cell
| Cell
|- style="text-weight:bold;"
! Bold Header Cell
| Bold Cell
| bold Cell
|}
Wiki Organization
As stated previously, making information accessible and easy to find is just as important (if not more sometimes) than providing as much information to the read. Our Wiki is organized in a very specific way.
Page Type
All of our wiki pages can be broken down into 6 distinct pages:
- Location Page: A page that shows the image of a single station location and lists out pertinent information such as a short description of the location, its content, security level, access, and a few other items.
- Job Page: A Page that describes a job/role and the jobs purpose as well as how to fulfill its responsibilities in-game. These pages may also serve as mini-guides to the role and provide specific information detailing how to do certain role-unique actions.
- Guide Pages: A page that serves to teach players about a group of related mechanics and features. These pages explain how to obtain certain items, perform certain actions, and overall fully utilize all features that pertain to the subject matter.
- Item Pages: A page that serves to document all available game items/objects/structures related to its theme. Will generally list the object, its sprite, its name, and a light description of the object detailing what actions the object can perform and linking it to any other pertinent guides or roles.
- Lore Pages: A page that details the lore for our server.
- Navigation Pages: A page that has the purpose for directing the reader to articles containing knowledge that the reader is looking for. Pages like these may give a surface level explanation of a macro concept such as a specific department as a whole or overlying mechanic such as roles.
Having a wiki with pages numbering in the 3 digits poses a unique issue: even if all relevant and necessary info is present, how does a reader efficiently access it? The Mediawiki search engine is from from enough. The simplest answer is to both interconnect pages to allow for easy jumping article-to-article as well as establishing navigation pages that serve as a phone-book for all relevant articles of a macro topic (think an overlying topic such a "Engineering" or "Antagonist").
While this is a particularly complex topic to break down, its important for contributors to know how their article needs to slot into the larger wiki structure so that the article they spent so much time putting into is actually accessible and discoverable. A good article will make sure it is connected to other articles in the following ways.
Inter-Article Linking
It does not make sense for a reader to jump to a navigation page when they need to find an article closely (or even tangentially) related to the article they are currently reading. There are a few methods in which our wiki allows easy jumping between similar articles.
- Interwiki Links: These are the bread and butter of the wiki represented as
[[Space Law]]blue links on wiki pages, they allow the reader to jump to a referenced article. This is very important for when an article references a term or feature that it does not need to define within the article, for example if the article talked about the Captain or referencing a specific Random Event. - Sidebars: Sidebars are by far the quickest way to navigate through a macro topic. They do not necessarily link articles of similar page type but do link together pages that cover similar topics. For example: the engineering sidebar is visible on and links together each of these page Station Engineer, Guide to Construction, and Atmospherics because they are all "Engineering" focused articles (and are very useful for anyone looking for general information on engineering).
- Footers Infoboxes: Footer infoboxes serve to link together all pages of similar Page Type. That is, at the bottom of every job page is a large infobox linking all job articles. Unlike sidebars, these do not stick to a particular theme.
These three inter-article linking methods work together in perfect tandem. If implemented well and correctly, a reader can go from one article to another "related" article in a single-jump.
What about articles that are not "related?" It would be inefficient and useless to the reader if every single article was linked on every single page. It's just too much links and you run into the same issue of the reader not being able to find the information they want. The solution to this is a phone-book-esque page called a navigation page. Navigation pages serve to coalesce all articles of a particular theme under one page. They are very similar to sidebars in what they offer in terms of linked articles (with a little more information), however, they allow for jumping between other navigation pages. That means, instead of jumping from an article to another "related" article, the reader can now jump from one macro topic to another. For example, one can use the Engineering Portal to not only find articles related to "engineering" but also jump to other navigation pages covering completely different macro topics such as the Antagonist Portal or Security Portal.
Wiki Templates
Wiki templates are how contributors significantly count down on wikicode that is replicated across multiple page. For example, most headers, sidebars, maintenance headers, and otherwise standardized page UI elements are stored in templates. A template is exactly as the word defines it, predefined code that can be easily inserted into any wikipage with a simple template call. For the general wiki contributor, its only important to understand how to use these templates as well as what templates are available to use and when to use them!
How to Use
Disclaimer: It is important that you read the Template Documentation so you know what parameters it takes!
In order to call a template you must utilize double curly brackets: {{ and }} Inbetween those brackets you will need to put the name of the template.
For example, if I wanted to place a Work in Progress Template(see Template:Wip) over an article I'm working on I would call the template by its name in curly brackets. Additionally I've checked and seen that it takes one variable called assign. What I will need to now do is not only call the template but also give it parameter values. By using the pipe '|'character to separate the template name and parameters you can assign values to those variables.
{{Wip|assign=Sirryan2002}}


Assigned to:Sirryan2002
While it would be easy to copy over the code from Template:Wip, this is a much faster, easier, and shorter method of doing that. Lets look at another case involving manyvariables or parameters
In this case, we're calling the job-guides template! We can define the parameters by opening up the Template Call and using some line identifiers like so:
{{JobGuides
 | colour     = #CCAE18
 | department = Burger
 | image      = Burger.png
 | roleheader = Burger Jobs
 | roleguides = Burger Guides
}}
Doing this will fill in some of those missing parameters, and we'll get the following result:
As a rule of thumb, it's always a good idea to look at another page that has the template to see how it's being utilized. This not only cuts down on time, it will usually tell you what those other hidden parameters are!
Types
Maintenance Templates
These templates are all headers that indicate that there is something on the page that requires action from wiki contributors to either fix, create, or update.
Needs Revision:
- Most Common Template, indicates to contributors that something on the page should be revised
- Most useful for indicating incorrect information, improper formatting, missing information, or other article mistakes
{{Needsrevision|reason=This page is missing information about sleepers/blobbernauts/lavaland tendrils etc}}
Work In Progress:
- Indicates to contributors and readers that an article is incomplete and is in the process of being finished
- Most useful for newer pages or rewrites due to large reworks/refactors
{{Wip|assign=Yourmom}}


Assigned to:Yourmom
Stub
- Indicates to contributors that readers/contributors want this page but it still needs to be filled out
- Useful to mark out pages for information that doesn't exist on the wiki but should
{{Stub}}
Rewrite:
- Indicates to contributors that this page should be completely rewritten either from the ground up or have each section revised/vetted.
- Most useful for old pages that have core formatting and writing style issue that aren't worth the effort to rework with small edits at a time.
{{Rewrite|reason=There is no actual information structure to this page, most sections encourage actions that are against server rules or are against our rules regarding wiki content}}
REASON: There is no actual information structure to this page, most sections encourage actions that are against server rules or are against our rules regarding wiki content
Missing Images:
- Indicates to contributors this page is missing images that are references and another contributor should upload them.
- Useful for contributors who aren't well versed with getting images from the code but are capable of creating articles that need images to supplement them.
{{Missing Images|Missing=The Lavaland loot table is missing images for all cult and magic related items.}}
MISSING: The Lavaland loot table is missing images for all cult and magic related items.
Slated For Removal:
- Used for both files and articles, indicates that a page should be deleted.
- This template should be used sparingly and only for article with titles that are not useful redirects and/or should not be on the wiki.
- This template should be used for file pages that will never be utilized on the wiki in the near future or duplicate files.
{{Slated for removal|reason="Duplicate File" or "Why the fuck does this page exist? Who thought 'Crab Cult" is even a remotely useful article name?"}}


REASON: "Duplicate File" or "Why the fuck does this page exist? Who thought 'Crab Cult" is even a remotely useful article name?"
Outdated File:
- Used for files that contain images of outdated items such sprites, locations, or object that had changes made and now look different.
{{Outdated File|reason=Theta has moved from singularity to tesla equipment}}
Reason: Theta has moved from singularity to tesla equipment
Low Quality:
- Used for just about any reason other than "outdated" for files. Can be that the image is low resolution, has stray marks, was capture incorrectly, or downright contains incorrect information/content.
{{Low Quality|reason=Non-SDMM In-game screenshot preffered}}
Reason: Non-SDMM In-game screenshot preffered
Page Templates
These are the standard templates we use for our content articles! There's too many to list out so they are just listed.
- Headers
- {{JobPageHeader}}
- {{Location}}
- {{Obsolete}} - Indicates a page that contains content that has been completely removed from the game
- {{Out of Rotation}} - Indicates a page that contains game modes, ruins, events that don't spawn naturally (does not include admin-spawn only items/roles)
- {{{{NonIC}}}} - Indicates a page that contains content that players should not know ICly (reserved for dsquad and SST only)
- Footers
- {{JobsTable}} - List of all job pages
- {{Locations}} - List of all location pages
- {{Archive}} - List of all obsolete pages
