Guide to Cargo
Assigned to:Sadhorizon
Departmental Head
Quartermaster
| Quartermaster • | Miner • | Explorer • | Cargo Tech |
Supply department is what keeps the station moving, thanks to constant deliveries from Nanotrasen#NAS Trurl and Guide to Lavaland#Lavaland. It can be divided into two parts:
- Miners, who are constantly risking their life on a hellish planet, to supply highly desired ore to your station.
- Cargo bay and office, responsible for supplying goods, distributing mail and handling crate shipments.
Working in cargo is rather simple, which makes it a perfect starter department
This guide is meant to explain the second part, cargo and how to handle it.
Autolathe 
An autolathe is a fabricator of tools and materials. It must be filled with a certain amount of metal or glass before being able to create these items, and it can also recycle these items if needed. Managing your autolathe is a task that's both important, and easy to pick up.
People will come to your office, asking for certain items. As a Cargo Technician it is your duty to answer those requests!
Using the Autolathe
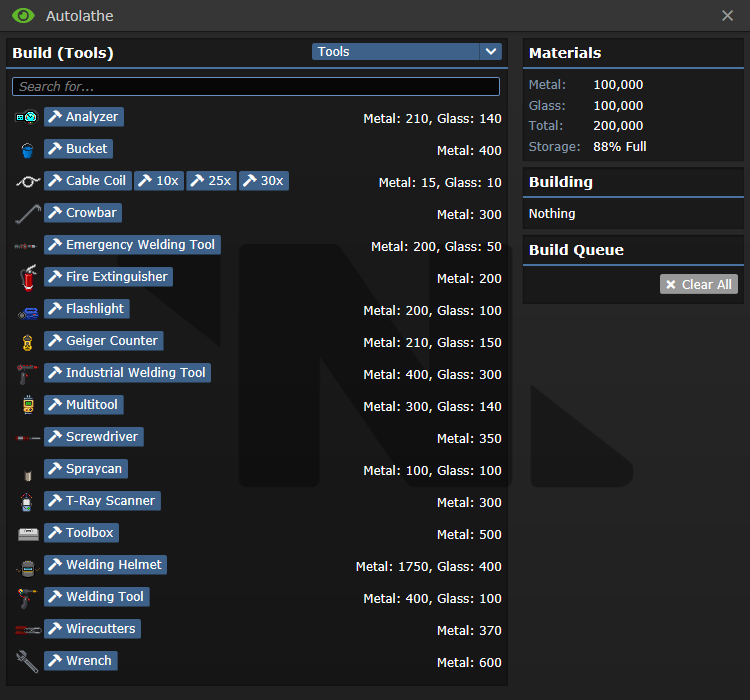
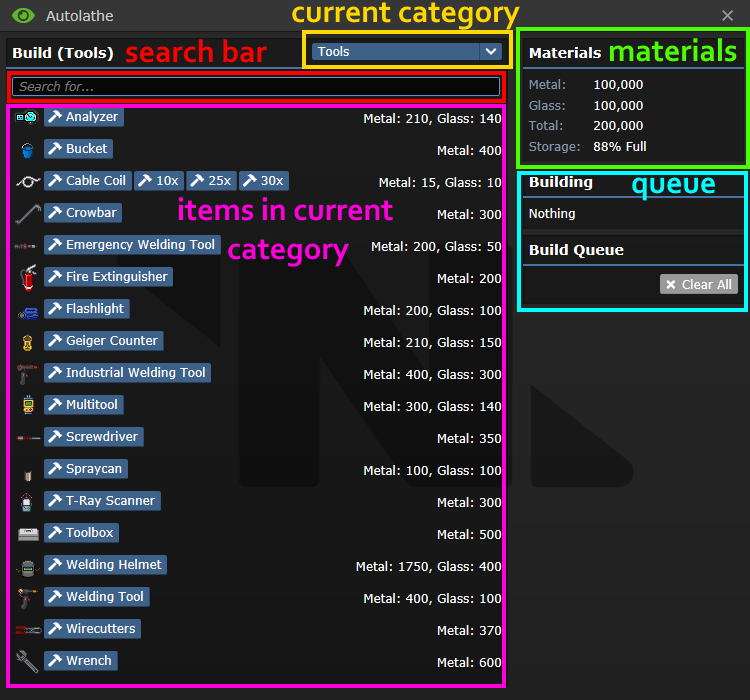
After clicking on the Autolathe, it will present you with this window:
If a position is grayed out, it means autolathe is out of either metal or glass.
To find an item, either look for it in the correct category, or use the search bar.
What items can the Autolathe print?
Ore Redemption Machine 
Your colleagues working in mining regularly deliver materials, and put them inside of this giant smelter. After they leave, it becomes your job to dispense those goods to the ever-hungry crew. Certain jobs can access the ORM freely, but, for example, assistants, cannot. Those kind of crew need your help with getting what they need.
Stations needs those materials for research, saving lives, or even simply redecorating.
Taking and Filling Orders 
Request console is the ever-beating heart of cargo. People can spend their hard-earned money (or corporate funds) on items that cannot be found anywhere else.
Using the Supply Shuttle Console
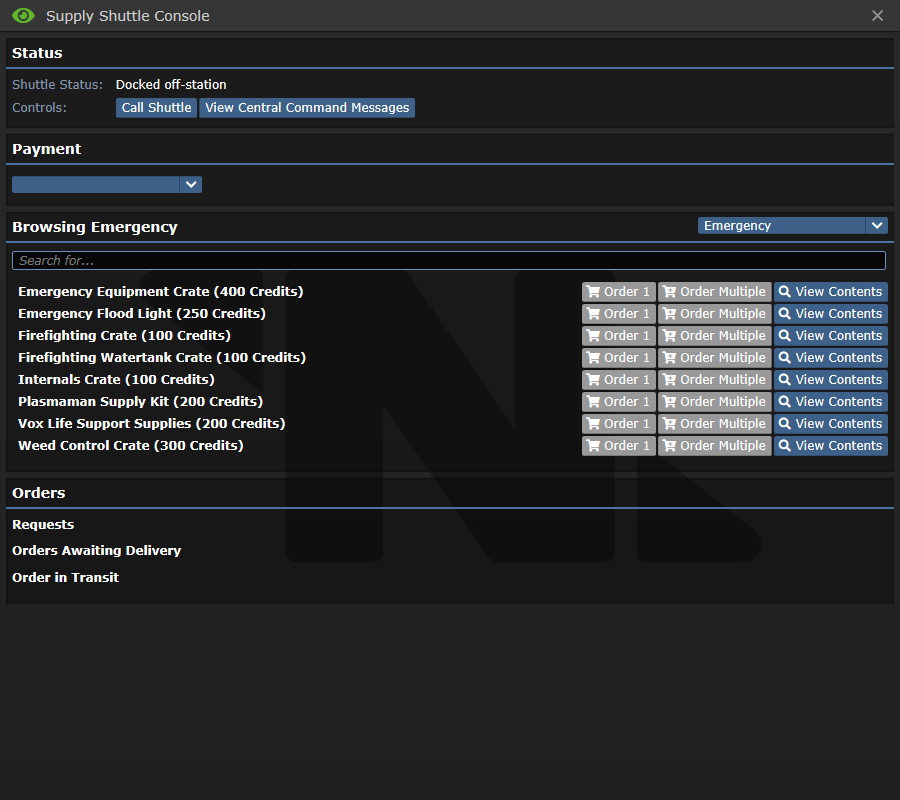
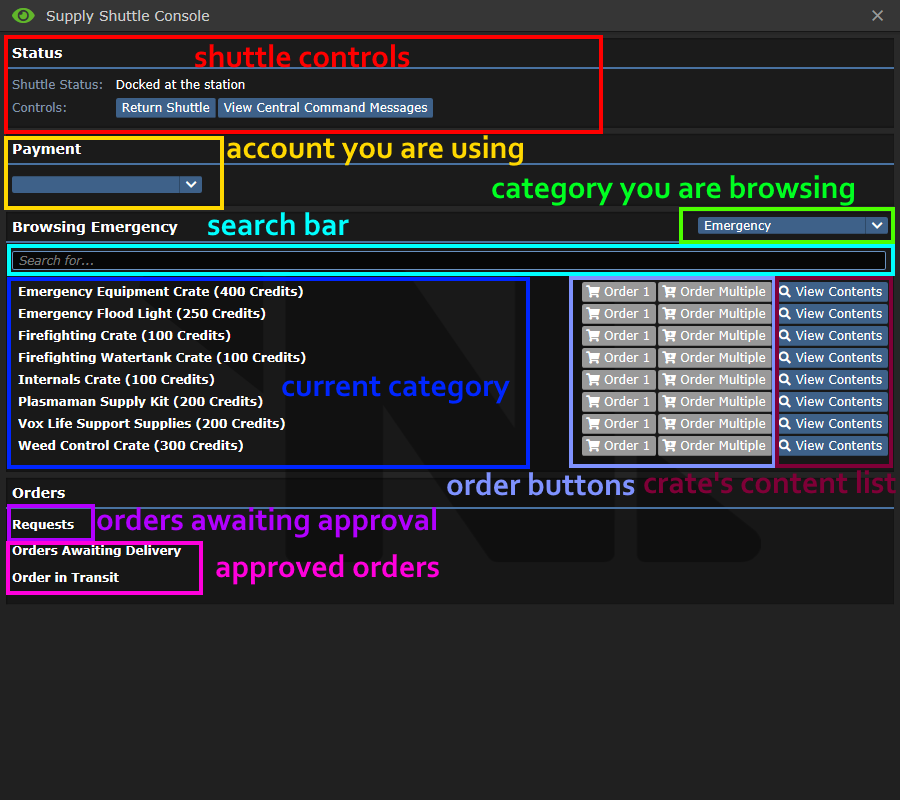
After clicking on the console, it will present you with this window:
Ordering Crates
In order to order a crate:
- Choose the account.
- Find what you are looking for. You can use both the categories, or the search bar.
- Select amount of orders you are making, fill out the reason.
- If you are a Cargo Technician, approve your order and wait for it to arrive.
- What can be ordered?
Approving Orders
- Personal Account Orders
If an order was placed with someone's personal account, any Cargo Technician can approve it. To do so, simply click the Approve button.
- Departmental Account Orders
If an order was placed with a departmental account, only the appropriate command member can approve it.
Supply Account is different, as any Cargo Technician can also approve orders with it.
Here is a table of which head may approve what:
| Account | Can approve orders |
| Command | Captain, Head of Personnel, Nanotrasen Representative and Blueshield |
| Security | Captain and Head of Security |
| Engineering | Captain and Chief Engineer |
| Science | Captain and Research Director |
| Medical | Captain and Chief Medical Officer |
| Service | Captain, Head of Personnel, Nanotrasen Representative and Blueshield |
| Supply | Captain, Head of Personnel, Quartermaster, Any VIP and Cargo Technicians |
| Assistant | Captain, Any Head and Any VIP |
- Denying Orders
In case there is something sketchy about an order, you should consult the Quartermaster wether to approve it or not.
An example (shown in the UI pictures) would be Mr. Rob Banks, an assistant, ordering combat shotguns for "redecorating".
To deny an order, press the Deny button.
Bureaucracy 
After any order is placed, a ![]() Requisition Form will be printed. You can
Requisition Form will be printed. You can ![]() stamp them appropriately and hide them in your
stamp them appropriately and hide them in your ![]() cabinet or your
cabinet or your ![]() clipboard.
clipboard.
After any order arrives on station, it comes with a ![]() Shipping Manifest. Those are needed when exporting goods.
Shipping Manifest. Those are needed when exporting goods.
In addition, sometimes, the Quartermaster may enforce Paperwork for other goods.
It usually results in giving ![]() item request forms to public, and only then fulfilling their orders.
item request forms to public, and only then fulfilling their orders.
It is done to keep a better track of supplies being distributed, but otherwise it slows everything down and makes crew very annoyed.
It is highly advised to drop any paperwork once a massive, staion-wide threat is confirmed.
Deliveries
Delivering orders is a major part of your job! There is a mountain of ways to do so, some more effective than others.
Using a MULEBot 
MULEbots are essentially delivery bots. You can load them up with crates and send them where they need to be at!
You can find two in the Cargo Bay, or order a few more!
Sending Crates
- Drag the
 crate on to the
  MULE.
MULE. - Set a destination with your
 PDA or on the control panel.
 - Send the MULE off!
MULEbot maintenance
- To fix MULEbot's damage:
In the case your MULE has been injured but not destroyed you can repair it in 5 easy steps.
- Unlock the Bot with an appropriate
 ID.
ID. - Screw open the maintenance panel with a
 Screwdriver.
  Weld the bot until it is fixed.
- Screw close the maintenance panel with a
 Screwdriver.
 - Lock the Bot with an appropriate
 ID.
ID.
- To re-charge a MULEbot:
In the case your MULE has ran out of power, follow these steps.
- Open up the maintenance panel with a
 screwdriver. (Make sure the controls are unlocked first!)
 - Take out the
 power cell. (Top entry.)
 - Insert charged
 power cell.
 - Close panel with
 screwdriver.
 - Turn the
 Mulebot back on.
Hidden Functionality
Any MULEbot can be hacked to change it's behaviour. It is worth noting, hacking MULEs is against the SoP and may get you fired.
Disposals Mail
This is an alternative way of delivering items, and is usually preferable to MULE transport as long as the pipes are still intact.
- Wrap your item/crate with
 package wrapper.
 - Pick up the
 destination tagger and click it to set a destination.
 - Use the
 destination tagger on the
  parcel.
- Stick it on the
 conveyor, or dump it in a
  disposals unit, and let the system handle it.
You can also gift wrap packages, but these cannot be tagged with a destination, and have to be delivered manually. This will not work with large objects. The process is slightly more complicated.
- Pick up the item you want to wrap.
- Hold a sharp object in your other hand. (
 Wirecutters are the most common for this.)
 - Click the
 wrapping paper with the item you want to wrap.
Gift wrapping a human is also possible, but they must have a straight jacket on and you need the wrapping paper in your hand. This is usually not a good idea.
Request Console Shipping File:Request Console.png
Used for smaller, item-sized shipments. Does NOT support delivering crates.
- Find the nearest File:Request Console.png Request Console
- Click the "Print Shipping Label" button.
- Select the destination.
- Swipe your
 ID on the File:Request Console.png console, press the "Print Label" button.
 - Put the item inside of the
 shipping package.
 - Seal the
 package. (Use the box in hand.)
 - Put it inside of a [File:Disposal bin.png|32px]] disposal unit.
The Telepads
Cargo Office and RnD start with a ![]() cargo telepad.
cargo telepad.
You can link the ![]() Rapid Crate Sender (RCS for short) with said telepads. RCS can then be used to teleport crates and lockers to that telepad.
Rapid Crate Sender (RCS for short) with said telepads. RCS can then be used to teleport crates and lockers to that telepad.
- Teleporting Crates
- Recharging the RCS
- Put the
 RCS into a
  recharger. (It can be found in your office.)
 - Wait.
- Once the recharger starts glowing yellow, click it to take the
 RCS out.
Using the telepads efficiently
When a massive order arrives, a smart cargo employee may move their telepad to the delivery spot. To do so,
A bored Cargo Technician may choose to grab the ![]() RCS and go Crate Hunting in Maintenance. It is a good idea to move the
RCS and go Crate Hunting in Maintenance. It is a good idea to move the ![]() telepad closer to the Export Conveyor Belt in Cargo Bay.
telepad closer to the Export Conveyor Belt in Cargo Bay.
Getting more telepads
To get more ![]() telepads, you can ask RnD for
telepads, you can ask RnD for ![]() Telepad Beacons.
Telepad Beacons.
Use one in hand to summon a brand new ![]() telepad.
telepad.
The Loader MODSuit 
You can order a special MODsuit from Central Command. The Quartermaster starts with one in their office. Once activated, it allows the user to carry up to six crates.
- Using a MODsuit
- Loading a MODsuit
- Unloading a MODsuit
By Foot
Extremely inefficient, but when everything else fails, grab the crate and take it straight to it's new owner!
To drag a ![]() crate, hold "CTRL" and click it.
crate, hold "CTRL" and click it.
Station Mail
Exports
Exporting goods is an important part of your job too. It generates income for supply department, which you can then spend on goods! To correctly export an item, it needs to be on the Supply Shuttle. If an item isn't a crate, it needs to inside of one.
- Here is a list of items that can be exported
 Crates - 15 Credits each to supply account.
 Stamped Manifests - 5 credits each to the supply account.
 Plasma Stacks - 10 credits for every unit exported to the supply account.
 Enemy Intel Documents - 750 credits each to the supply account.
 Exotic Plant Seeds - Gives variable credits depending on plant seed type, rarity, and potency. The revenue is split 50/50 between service and supply.
 Research Levels - Stored in technology disks, they give variable credits depending on research type, rarity, and level achieve. The revenue is split 50/50 between science and supply.
- For further explanation of pricing,
See Also Station Economy
Leftover Money
If supply account is filled with cash (read: there is about 2500 spare credits), and the Quartermaster allows it, as per your SoP, you can spend some of it on whatever you want!


